We process your personal information to measure and improve our sites and service, to assist our marketing campaigns and to provide personalized content and advertising. By clicking the button on the right, you can exercise your privacy rights. For more information see our privacy notice.
Privacy Policy

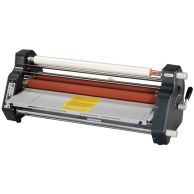
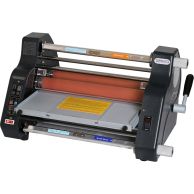
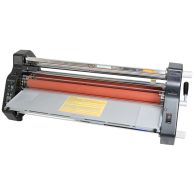
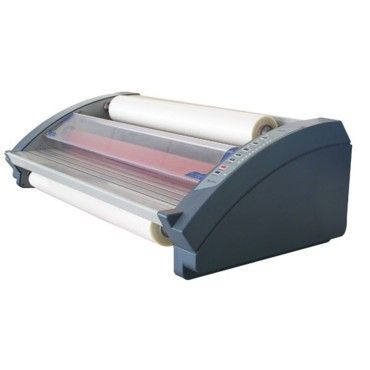
Royal Sovereign RSL-2701 27" School Roll Laminator (Discontinued)
0
NewCondition
OutOfStock
Royal Sovereign RSL-2701 27" School Roll Laminator (Discontinued)
We're sorry, but we no longer sell this item.
Below are a few alternative options that may be a great fit for your needs.
If not, please call us at (866) 537-2244 for personalized recommendations.
-
Tamerica TSL-2700 27" Roll Laminator
$1,299.00
-
Tamerica TCC 1400i Roll Laminator
$1,205.00
-
Tamerica TCC 2700XM 27" Roll Laminator
$2,830.00


SWIPE FOR MORE IMAGES
- 0
- 1
- 2
- 3

Overview
The Royal Sovereign RSL-2701 is a 27" school laminator that fits great into education-restrictive budgets, space, and capability requirements. This roll laminator allows for up to 3 mil laminate films and up to 27" wide at speeds up to 7.9 feet per minute. Speed and heat are both adjustable settings so you can tailor them to your specific application and material requirements. This laminating machine is easy to operate, has independently controlled rollers, and a reverse function for mis-feeds. It can help you achieve professional-quality output, without the expense associated with a "bells and whistle" machine. Instead, the RSL-2701 offers all of the basics you need to get the simple jobs done, and get them don right.
• Capable Thermal Laminating
• Variable Speed & Heat Settings
• 1" Core Films
• 7.9 Feet / Minute Maximum Speed
• Variable Speed & Heat Settings
• 1" Core Films
• 7.9 Feet / Minute Maximum Speed
Specifications
| Item # | 04RSL2701 |
|---|---|
| Manufacturer | Royal Sovereign |
| Manufacturer Part Number | RSL 2701 |
| UPC/EIN | 035565774363 |
| Power Voltage | AC 100V, 60Hz |
| Dimensions | 36.2” x 20.5” x 12.6” |
| Certifications | UL |
| Manufacturer's Warranty | 1 Year Limited (Parts & Labor), 6 Month Rollers |
| Size | 27" |
| Color | Gray |
| Operation | Electric |
| Double-Sided Lamination | Yes |
| Thermal Laminating | Yes |
| Cold Laminating | No |
| Speed | 7.9' / Min (Feet per Minute) |
| Heating Type | 4 Silicone Rollers |
| Warm-Up Time | 10 Minutes |
| Maximum Mil Thickness | 5 Mil |
| Temperature Range | 210˚ - 310˚F (98˚ - 154˚C) |
| Adjustable Temp | Yes |
| Core Size | 1" Core |
| Reverse Function | Yes |
| Capable of Mounting | No |
| Integrated Cutter | Yes |
| Stand-By / Power-Save Mode | Yes; After 30 Minutes Inactivity, Hold temp of 175˚ F |
| Auto-Shut Off | Yes; After 60 Minutes of Inactivity |
| Shipping Weight (lbs) | 133 |
| Product Weight (lbs) | 110 |
| Shipping Dimensions | 44.5” x 29” x 21” |
| Shipping Information | This item ships via Truck (Common Carrier). It is the responsibility of the Consignee (receiver) to remove the product from the truck. If you do not have a loading dock or any other means to lift the freight off the truck and/or you need assistance bringing the product inside of your location please call (866) 537-2244. Click here for full details. |
Description
The RSL-2701 from Royal Sovereign is an ideal laminator for schools and education organizations that need the ability to laminate basic documents, posters, signs, and more. This affordable machine is easy to use and offers trouble-free laminating with the use of any 1" core thermal film up to 3 mil thick and 27" wide. It offers premium silicone rollers for consistent, even heat from edge-to-edge, and allows for double- or single-side lamination. Adjustable heat and speed settings with 10 selections each let you adjust the machine to your specific application requirements, and a reverse switch lets you control and prevent jams. With the Royal Sovereign RSL-2701 lamination machine, you can create the look of a professionally laminated items without the expense or time associated with outsourcing. It will produce your documents as quickly as 7.9 feet per minute, a respectable speed for a laminator of its size.
How to Load Film
The first step to laminating is to, you guessed it, load the film! Make sure you choose a compatible lamination that is no wider than 27", has a 1" core, and is no thicker than 3 mil. Once you have your thermal laminate ready, here is how to install it on the RSL-2701. Be sure to check our videos tab for help, as well as the official manufacturer's instruction manual, which offers these same instructions with drawings and figures.
Top Roll
- Slightly slide the upper film shaft to the right and pull it out from the machine.
- Take both lock core adapters off from the shaft.
- Insert one of the core adapters into the right end of the film core. For film with poly-in (adhesive side is inside the web), make sure the adhesive side is facing upward.
- Insert the film shaft into the roll of film from the right side with the copper end last. Align and insert the core adapter on the left end of the film core.
- Center the film on the shaft and lock it in place with the locking core adapters.
- Carefully return the film shaft back into place.
Bottom Roll
- Repeat steps 1 to 5 above for the lower roll film.
- Once the upper and lower film is on the shaft, pull the film from the top and roll down to the bottom roll to make certain that the film is aligned properly. Then tighten the lower locking core screws. Note that if the film is not aligned properly exposed adhesive will adhere to the rollers and may cause the film to jam
Film Webbing / Threading
- Set the temperature and speed according to the Recommended Temperature and Speed section.
- Remove the Front Table.
- Pull down the upper film over the Safety Cover to the lower film; align and center the lower film to upper film.
- Rewind the upper film until the film aligns with the Safety Cover.
- Thread the film over the Upper Idle Bar and underneath the Safety Cover and pull down until it drapes over both upper and lower hot rollers.
- Carefully pull up the laminate from the lower roll up and drape it over top of the upper film (over the top hot roller).
- Reinstall the Front Table and close the Safety Cover.
- Insert and push the leader board into the hot rollers and press the run button.
- Press the Stop button when the leader board has completely exited the rear of the laminator.
- Use the Cross-Cutter to remove the leader board.
- Trim any excess film off of the leader board. The leader board can be re-used.
Troubleshooting
The most common issues users may encounter are easily resolved with these troubleshooting tips. Remember to always refer to the user manual and your warranty details before performing maintenance or repairs, or contact an authorized service provider or trained mechanic.
| Problem | Cause | Solution |
|---|---|---|
| Rollers do not operate after the RUN/STOP button is pressed |
a. Safety cover is open b. Power cord not plugged in c. Front table not on properly d. Machine not turned on |
a. Ensure cover is closed properly b. Ensure plugged in properly c. Ensure table on properly d. Turn on the machine |
| Machine not heating up | Call your authorized dealer | |
| Cloudy lamination | a. Film tension not balanced b. Lower idler bar not in proper position c. Temp too cold/speed too fast |
a. Adjust tension b. Push bar into proper position c. Increase heat/slow down speed |
Videos
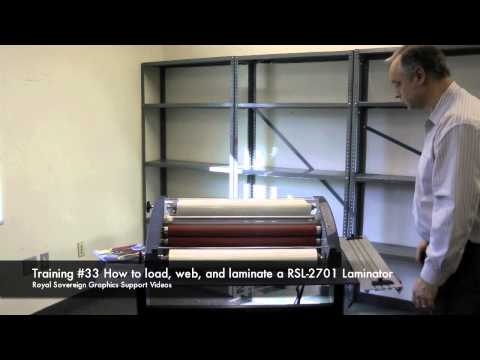
How to Load, Web, and Laminate
Transcript:
Today we're going to show you how to web, load, and laminate on a Royal Sovereign 2701 Laminator.
First what we need to do is to show you the functions of the machine so you're familiar with the operation of the laminator. On the back of the machine, you have your power button. Turn that on, you'll hear a beep, the machine will light up on the control pad to show you the operation functionality of the machine. On the bottom of the machine, you have the run button and also the functions as sto... Read More
First what we need to do is to show you the functions of the machine so you're familiar with the operation of the laminator. On the back of the machine, you have your power button. Turn that on, you'll hear a beep, the machine will light up on the control pad to show you the operation functionality of the machine. On the bottom of the machine, you have the run button and also the functions as sto... Read More
Today we're going to show you how to web, load, and laminate on a Royal Sovereign 2701 Laminator.
First what we need to do is to show you the functions of the machine so you're familiar with the operation of the laminator. On the back of the machine, you have your power button. Turn that on, you'll hear a beep, the machine will light up on the control pad to show you the operation functionality of the machine. On the bottom of the machine, you have the run button and also the functions as stop button. You have a reverse button and it will only work if the button is depressed. You have a down and an up button that you'll see will light up and change your speeds from 1 to 10. And you also have three temperatures.
For the material that we're going to be running today, we need to use the highest temperature which is 270 to 310 degrees. So by depressing that button, we will get the temperature that we need. As you see it's flashing. Once it stops flashing, it means we're up to temperature.
The first thing we need to do is to load the film on the Royal Sovereign 2701 laminator. By taking our film, we first have to see how the adhesive is rolled onto the film whether it's adhesive in or adhesive out. For this particular film is adhesive in. What we want is to have the film when it comes down over the rollers to be away from the roller with your adhesive out. We'll take this film. And first we have to take off the supply shaft. On this side of the machine, you'll see that there's an indent. We need to lift up, move this shaft over that side, and we'll get this shaft out of the machine.
Now we take these thumb screws and remove the hubs that hold the film. Next we'll take our film in the right direction and we're going to insert one hub. This hub will be inserted into the side into the core of the machine of the roll. Next we'll take our hub shaft and this will go into the machine like so.
Take our other hub, put it on the shaft, and slide it into the core of the film. Once it's in there, we're going to load the film back on to the machine by centering into that hole, putting this side into the notch, and dropping this down into the groove.
Next we want to position our film so it's centered and tightened up on the two figure screws. Now we have the film on there and as you can see, I have the adhesive so it will not touch the rollers. Next we have to load the film to the bottom shaft of the laminator.
By coming to the front, we'll lift up on this protective cover, take off the table, center the side, and again we have to remove our film supply shaft from the laminator. We have a notch here. Just bring it in and over and it will drop out and we'll remove our two film hubs. Now again, we have to look at our film and see the adhesive on the film. And again, this film is adhesive in. So if we have it positioned this way on the machine, it'll come up over the rollers with the adhesive out.
We again take our hub, place it into the core, take our supply shaft, put it into the roll of film, grab out other supply shaft, put it inside, make sure it's taut, then take our film, put it in here, and lock it into that side, and drop this side down. Now we have our film in. We're going to leave this one loose for now.
And now we have to web the machine. We're going to take our film, put it underneath the idler bar like so, and then we're going to bring the film down over the roller. Be careful because the film is going to get tacky and the rollers are hot.
The next thing we're going to do is to center our film over this roller by sliding it back and forth. When centered, we can tighten down our hubs. Next, we're going to take our bottom supply, bring it underneath this idler bar. Make sure your idler bar is out. Bring the film up and we're going to tack this film to the top film. We want to make sure it's centered left and right with the other roll of film and just place the film over top the other. The two films will fuse together from the heat of the roller.
Next, we're going to take our feed table, put it back on the laminator, and we're going to drop our guard down. Next we need our leader board. We're going to take the leader board and hit run on the machine. We're going to take our leader board and we're going to force it into the laminator. As you see, this will bring the film into the machine.
It'll come out the back rollers and exit the laminator. Once the leader board exits the laminator, we now can come over here and hit the stop button. Next we take our cross cutter and cut this material off the laminator. Now we're ready to laminate. For this particular material that we're running, we're going to go to speed 3 on the laminator. Once this is up to temperature, we can start laminating.
Now that our light is not flashing anymore, our laminator is up to temperature, and we're ready to laminate. What we have supplied with the machine is two document guides. By turning these knobs counterclockwise, we can move them in and out on the laminator.
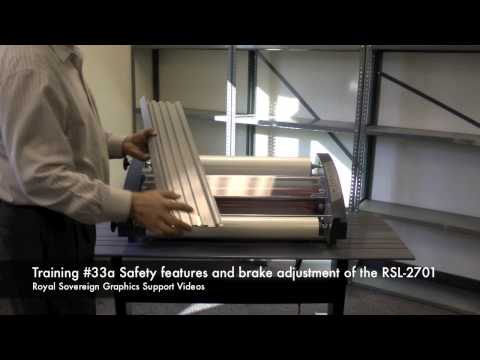
Safety & Brake Adjustment Features
Transcript:
In this video, we will show you the safety features and brake adjustments of the Royal Sovereign RSL-2701 Thermal 27" Roll Laminator. This is training video installment #33a of our graphics service videos.
In this video, we will show you the safety features and brake adjustments of the Royal Sovereign RSL-2701 Thermal 27" Roll Laminator. This is training video installment #33a of our graphics service videos.
Product Reviews
Write Your Own Review
Frequent Asked Questions
Submit a New Question


