We process your personal information to measure and improve our sites and service, to assist our marketing campaigns and to provide personalized content and advertising. By clicking the button on the right, you can exercise your privacy rights. For more information see our privacy notice.
Privacy Policy

How to repair your old or damaged books to like-new condition
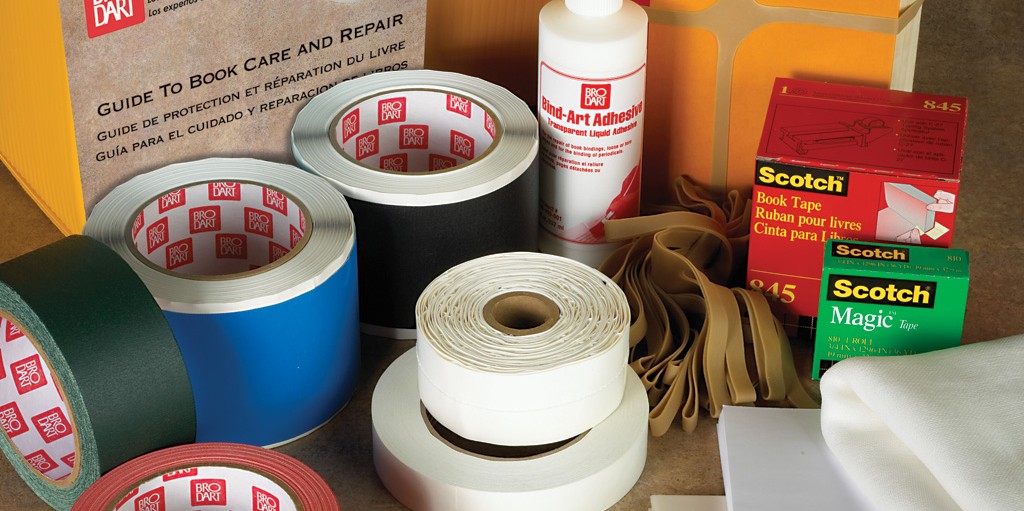
Need to know how to repair a book? Binding101 has all you need to repair and care for damaged and broken book bindings, including full book repair kit, tape, corner reinforcement protectors, flexible adhesive and more. For those books that are close to heart, mend the bindings and corners using the helpful tips and product suggestions below. Book repair is fairly simple and can quickly restore book bindings to near-original condition. (Note: If the book is extremely old or a collectible item, then we recommend you take the book to a professional repair specialist)
Hinge Tightening (Hard Cover Books)
To prevent further damage, tightening the hinge of a hard-cover book when it starts to first show signs is ideal. To find out if the hinge needs tightening, hold your hard cover book by the covers, with the pages facing down, using your fingers to just support the bottom of the pages. If you notice that the page block has become loose in the cover, or if the end pages are pulling away from the inside of the covers but is still securely bound to the page block, then hinge tightening is a solution that may work for you. (Use method #1 steps below.)
Another way to determine if hinge tightening is the best method to use is to first open the cover. If the end pages (or the end pages and title page) are pulling away from the inside of the cover and the spine lining is still visibly in-tact, then hinge tightening is needed to prevent more major repairs or rebinding in the near future. (Use method #2 steps below.)
What You Will Need:
- 1. PVA (polyvinyl acetate) Flexible Adhesive
2. Bowl or container (optional; to hold adhesive)
3. Knitting needle or long plastic rod, thin enough to enter between the page block & cover
4. Folding bone
5. Table Clamps (or heavy materials for placement on top of the book)
6. 2 (or more) sheets of wax paper
7. Paint brush (small-medium size)
Hinge Tightening Steps (Method #1):
Step 1) Stand the book on its tail. With one hand, prop open the loose hinge as wide as possible. Dip the knitting needle/plastic rod into the adhesive, scraping excess adhesive off as you draw the needle out of the container. Push the needle into the hinge (between the book block and cover) as far as it will go. Using a twirling motion, apply the adhesive thoroughly to the entire area. Turn the book over and repeat (if needed).
Step 2) Lay the book flat and align the page block squarely in its cover. Partially open the cover and, using the long edge of the folding bone, gently press the fold of the endpaper into the hinge. Insert a sheet of waxed paper as far as possible back into the hinge to prevent excess adhesive from sticking to the endpaper and assure proper opening of the book after drying.
Step 3) Make sure the pages are still square in the cover, and run the long edge of the folding bone down the length of the outer spine (on the front & back covers, where the crease from opening will form).
Step 4) Repeat steps 2 and 3 for the back of the book.
Step 5) Place flat even object on the front and back cover of your book. Clamp the book (or press using heavy objects) down for at several hours (overnight is recommended).
Hinge Tightening Steps (Method #2):
Step 1) Open the book to the place where the page block and end paper have separated. Lay a piece of scrap paper along the page block about 1/8” from the exposed hinge area. Carefully brush PVA flexible adhesive on the exposed spine lining and on the underside of the fold of the endpaper.
Step 2) With the book still open, carefully align the endpaper and the text block to ensure that the fold of the end sheet exactly meets the shoulder of the text block. This will help to assure proper opening of the book after drying.
Step 3) Using the long edge of the bone folder, gently press the fold of the endpaper into the hinge.
Step 4) Insert a sheet of wax paper as far back as possible into the hinge. This will prevent excess adhesive from sticking to the endpaper and also help to assure proper opening of the book after drying.
Step 5) Check to make sure that the text block is still square in its case. Then run the long edge of a bone folder down the length of the outer hinge of the case, applying even pressure.
Step 6) Press the book for several hours or overnight, making sure that even pressure is applied in the joints. Use one of the pressing methods discussed previously.
Tipping-In (Hard Cover Books):
Tipping-in is a method for incorporating loose pages (a detached page, replacement page, etc.) into an already bound book.
What You Will Need:
- 1. PVA (polyvinyl acetate) Flexible Adhesive
2. Bowl or container (optional; to hold adhesive)
3. Folding bone
4. Table Clamps (or heavy materials for placement on top of the book)
5. 2 (or more) sheets of wax paper
6. Paint brush (small-medium size)
Tipping-In Steps:
Step 1) If the page to be tipped in is larger than the pages of the volume, carefully trim the page to size using a paper cutter. (For replacement pages, try to preserve original margin widths.) Sandwich the page, reverse side up, between two pieces of scrap paper, leaving 1/8-inch visible along the binding edge of the page. The top strip of scrap paper will protect the area that should not be glued. Apply a thin, even layer of PVA to the exposed 1/8-inch edge of the sheet.
Step 2) Carefully position the insert in place, setting it as far into the gutter as possible while ensuring that the edges are even with the rest of the text block.
Step 3) With the tipped-in sheet squarely in place, and starting in the middle of the page and working out to the top and bottom, slide the tip of a bone folder along the front (unglued) side of the sheet to press it tight.
Step 4) Place a sheet of waxed paper into the gutter between the insert and the page before it to protect the text block from excess adhesive.
Step 5) Press the book for several hours or overnight, making sure that even pressure is applied in the joints. Use one of the pressing methods discussed previously.
Paperback Spine Repair
Step 1: Get all your supplies and set-up a well-lit work space with a solid base.
Step 2: Re-glue any loose pages back to the spine using a Flexible Adhesive.
Step 3: Close the book tightly and set several heavy books (or other heavy objects) on top.
Step 4: Use your non-paper cloth to clean up and excess adhesive that may have squeezed out of the sides of the spine
Tips for Book Repair Success:
1. Be patient. Take your time to mend the book bindings as rushing the repair will only increase the likelihood of an unsatisfactory result that will, in-turn, require more repairs later on.
2. Flexible glues. The flexible glues discussed above are not required for mending books, but are highly recommended. The flexibility of this adhesive (versus, let’s say, standard Elmer’s glue) will help the pages to bend without tearing sheets.
Tired of repairing books? Prevent future damage with Book Protection Tips:

Use book covers. Adhesive applied for permanent protection, or slip-on book covers for temporary protection will extend the life of your soft and hard cover books greatly. They prevent the oils from fingers getting on the actual covers, which keeps them clean and helps prevent degrading. Plus they protect the delicate edges and corners of the books to help prevent bending and folding, keeping your book covers straight and smooth for as long as possible.
Use corner protectors to protect the corners, without hindering the entire cover with a full wrap-around solution. Soft-cover book corners are easily bent and torn after just one read-through, especially when handles by children. Protect those fragile corners with adhesive corner protectors that easily stick onto your book corners to keep them straight and prevent bending and tearing..
Use cloth wings around the edges and corners. These are applied to the edge of a hard book cover and add extra stability for heavy usage.


Hi! My name is Mallory and I have been in the industry since 2008. If you do the math, that is over 15 years. I have spent my time at Binding101 in many roles, including customer service, sales, e-commerce management, video production, and more! Because of this vast experience, I bring a truly expert touch to the content in our blog. widdling down complex topics to extract what our customers really want to know. As the Content and UX Manager, I act as a writer and editor for the majority of copy you will find here. When not at my computer, I love spending time binging stand-up comedy, baking, and cuddling up with my family and rescued cats and dogs...
Related Products

0 Comment(s)


Trending Now

How to Bind Paper
January 29, 2019
What are the Best Laminators for Foiling?
July 10, 2018
How to Make a Wire Calendar 3 Different Ways
September 04, 2018
Everything you need to know about Foiling (with FAQs)
June 22, 2018
