We process your personal information to measure and improve our sites and service, to assist our marketing campaigns and to provide personalized content and advertising. By clicking the button on the right, you can exercise your privacy rights. For more information see our privacy notice.
Privacy Policy

How to Make DIY Photo Canvases for Sale
January 04, 2019
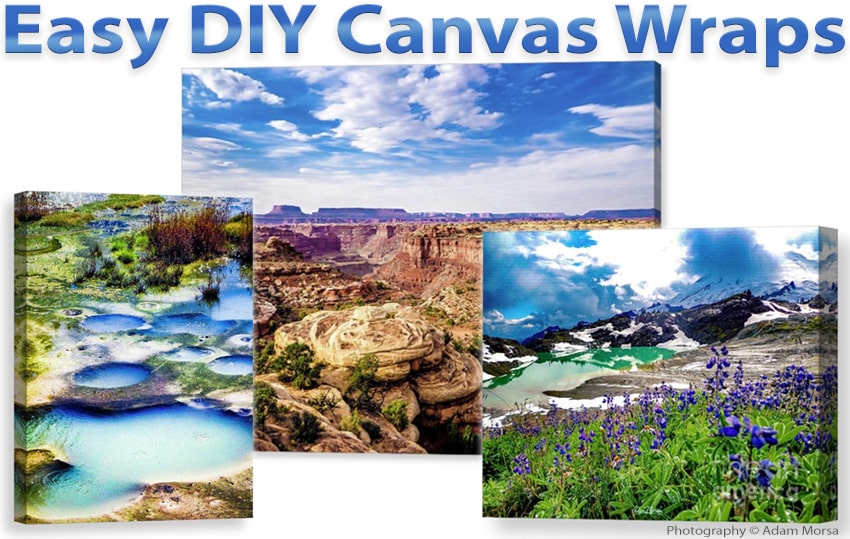
If you've been wanting to sell your photography at local farmer's markets and art walks, but don't want to pay the high price to have them made at a photo studio, check out these DIY photo canvas wrap kits instead. They have everything you need to turn your canvas or print into a beautiful stand-out hanging display. No complicated tools or expensive equipment is needed! Seriously! Fast, easy, and professional quality (without the professional price), these DIY canvas stretcher frame kits are the perfect solution for photographers and artists, as well as photo studios, fine art galleries, and print shops.
Here is how easy they are to make:
① Prepare your workspace by ensuring the table is clean and free of dust. Your print will be placed face-down onto your table, so it is important that it be clean. If available, you can also use photo gloves to prevent dust and fingerprints.
② Peel off the liners from the bars. Be mindful of the exposed adhesive, and limit anything from touching it. Adhesive will be present along one wide edge of the length of the bar, as well as the ends.
③ With the adhesive facing up, snap the bars into the corner holders, creating the frame shape.
④ Lift your frame and place your print face down on your work surface. Now flip your frame so the adhesive is facing down, and center it above your print. Once centered to your liking, press the frame down onto the print so the adhesive sticks.
⑤ Now that your print is attached, you can remove the corner holders. Make sure to hold onto the bars as you pull the corners off.
⑥ Using your trimmer, create a 45° angle cut on all 4 corners. Do this slightly spaced from the wood, not flush. Then trim your print edges flush to the bars.
⑦ Create a perpendicular cut to each of the corners (from the center, out), and fold the cut pieces over the bars.
⑧ Beginning about 1" in from the corners, apply a line of glue along each edge of your print beside the bars. That gap from the corner will ensure no glue seeps out.
⑨ Two sides at a time, fold the bars up so the corners touch, and secure them in place with fasteners.
⑩ Snap in the supports to each corner. And you're done! Admire your beautifully framed print.

So simple, right? Who knew making professional-quality wrapped prints would be so easy! Now let's go over everything you will need to get started. You can get everything you need right here.
• GOframe starter kit -- This kit includes the corner holders, the trimmer, and a 4oz. bottle of canvas glue.
• The frame sets -- Choose a set for whatever size print you want to make. You can choose from 11" x 14", 12" x 18", 16" x 20", 16" x 20", 18" x 24", and 20" x 30". The sets have enough bars to make 5 frames each.
• Your print -- You can have your print created at a print shop on nearly any material. Most customers use a 300-450gsm canvas, but photo paper will work fine as well. Make sure your print is at least 3 ½" larger on each dimension to allow for wrapping. For example, if you are making a 16" x 20" wrap, your print should be at least 19 ½" x 23 ½".
Whether you make them for family photos to display in your home, at your studio to auction your fine art prints, or at local art walks to sell your landscape photography, these easy mount photo frames are professional and fast! You can make them in less than five minutes.
The photography featured in this blog was courtesy of Rambling Adam Fine Art Photography and is © Adam Morsa.


Hi! My name is Mallory and I have been in the industry since 2008. If you do the math, that is over 15 years. I have spent my time at Binding101 in many roles, including customer service, sales, e-commerce management, video production, and more! Because of this vast experience, I bring a truly expert touch to the content in our blog. widdling down complex topics to extract what our customers really want to know. As the Content and UX Manager, I act as a writer and editor for the majority of copy you will find here. When not at my computer, I love spending time binging stand-up comedy, baking, and cuddling up with my family and rescued cats and dogs...
Related Products

Comment(s)


Trending Now

How to Bind Paper
January 29, 2019
What are the Best Laminators for Foiling?
July 10, 2018
How to Make a Wire Calendar 3 Different Ways
September 04, 2018
Everything you need to know about Foiling (with FAQs)
June 22, 2018
