We process your personal information to measure and improve our sites and service, to assist our marketing campaigns and to provide personalized content and advertising. By clicking the button on the right, you can exercise your privacy rights. For more information see our privacy notice.
Privacy Policy

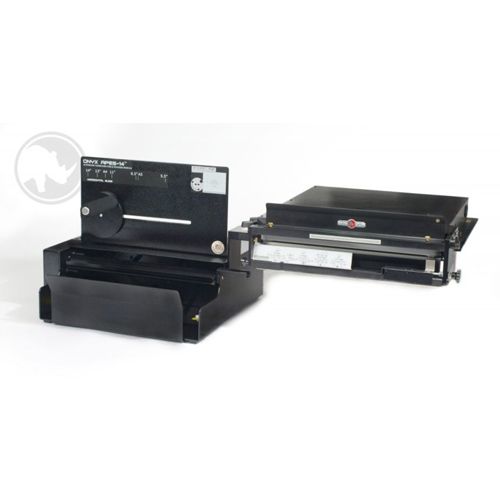
Rhin-O-Tuff Onyx APES-14 Auto Paper Ejector & Stacker
3899
NewCondition
InStock
Rhin-O-Tuff Onyx APES-14 Auto Paper Ejector & Stacker


SWIPE FOR MORE IMAGES
- 0
- 1
- 2
- 3

Overview
Designed for the Onyx HD and the HD series, the Onyx APES-14 Auto Paper Ejector & Stacker Module will make your paper punch more productive and easier to use. It punches, ejects paper, and stacks sheets in one operation, saving you precious time and reducing labor costs.
Specifications
| Item # | 04HDAPES |
|---|---|
| Manufacturer | Rhin-O-Tuff |
| Manufacturer Part Number | APESONYX |
| Paper Size | up to 14" x 14" |
| Warranty | 6 Year Manufacturer's Warranty |
Description
Designed for the Onyx HD and the HD series, the Onyx APES-14 Auto Paper Ejector & Stacker Module will make your paper punch more productive and easier to use. It punches, ejects paper, and stacks sheets in one operation, saving you precious time and reducing labor costs. The module works with the HD7000, HD7000 Plus, or HD7700 punches, transforming them into a semi-automatic punching system. It can handle paper that measures from 5½" x 5½" to 14" x 14". However, if there's a job the APES-14 can't handle, you can simply leave it attached to your punch in standard mode. Made to last, the Onyx APES-14 Auto Paper Ejector & Stacker Module comes with a 6-year manufacturer's warranty.
Features:
- Practical module that easily attaches to your paper punch
- Fast and accurate
- Creates a semi-automatic punch system that is up to 3 times more efficient
- Works with the Onyx HD and the HD7000, HD7000 Plus, and HD7700 models
- Punches, ejects and stacks sheets of paper in one go
- Makes your paper punch more productive while extending its life
- Can handle paper sizes from 5½" x 5½" to 14" x 14"
- Suitable for tabs and cover stock
- Standard mode available for odd jobs
- Meets CE requirements
- 6-year manufacturer's warranty
Videos
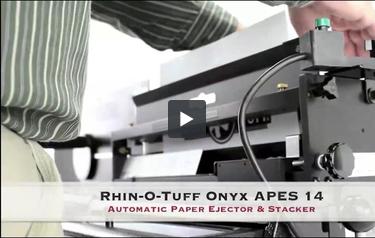
How to Increase Punch and Bind Productivity with Automatic Paper Ejectors and Stackers
Transcript:
This is a rhino tough. Let's have a look at Rhin-O-Tuff Onyx APES 14 an automatic paper ejector and stacker module for businesses and organizations that have a lot of punching and binding to do. The Onyx APES 14 could be a great investment. Essentially, it's an all in one unit but you drop your paper in, press the button, it punches, ejects the paper and stacks it all together. So regardless of the size of your project, it's ready to go to the binding phase next, the Onyx H 14 module was designe...
Read More
This is a rhino tough. Let's have a look at Rhin-O-Tuff Onyx APES 14 an automatic paper ejector and stacker module for businesses and organizations that have a lot of punching and binding to do. The Onyx APES 14 could be a great investment. Essentially, it's an all in one unit but you drop your paper in, press the button, it punches, ejects the paper and stacks it all together. So regardless of the size of your project, it's ready to go to the binding phase next, the Onyx H 14 module was designed to make your punching extremely efficient. That is Rhin-O-Tuff Onyx APES 14, automatic paper ejector and stacker module, and all of its pack by Rhin-O-Tuff solid with three year warranty Rhin-O-Tuff Onyx line.
How to Set Up and Run Rhin-O-Tuff's Punch and Bind Auto Ejector and Stacker Module
Transcript:
This is a Rhin-O- Tuff. Let's have a look at Rhin-O- Tuff Onyx APES 14 an automatic paper ejector and stacker module. In this video, we will put it all together and see it in action. The Onyx APES comes with its own assembly box pull out all the parts and lay them down flat. With tools and parts ready to go use the allen wrench on the left and right hand side to remove the bolts so you can put your frame on. Be sure only to remove the front two bolts on the top row. When all four bolts are remov...
Read More
This is a Rhin-O- Tuff. Let's have a look at Rhin-O- Tuff Onyx APES 14 an automatic paper ejector and stacker module. In this video, we will put it all together and see it in action. The Onyx APES comes with its own assembly box pull out all the parts and lay them down flat. With tools and parts ready to go use the allen wrench on the left and right hand side to remove the bolts so you can put your frame on. Be sure only to remove the front two bolts on the top row. When all four bolts are removed, use provided bolts to take the carriage with the frame and put it on each side. Bolts go right in here, two on each side. Fasten them all the way in, good and tight, nice and neat. It will be these two frames on which the ejector portion of the Onyx APES 14 will be fastened. When these are in place, make sure the top of the machine is completely clear, because we will set the paper ejector part of the Onyx APES 14, right there. But before we do that, we first have to remove the paper stop. Simply unscrew it and pull it right off, store it someplace safe. And if you have a Palm switch installed on your Onyx HD 7700 remove it as well.
And now gently place the paper ejector portion on the machine right here on the top of the punch, ensure that it's good flush and the holes line up. Then use the plastic handled screws to screw in both sides, one on each side, when those are down good and tight. If you'd like to, you can replace the Palm switch right here on the right hand side of the machine with a smaller on wrench, loosen up the front screw just enough to pull it out and slide the platform in, tighten the bolt all the way down so to hold the platform in place and on this attach your pump switch, setting it to your user preference. We've now finished installing the ejector.
Now for the paper stacker portion, note that you'll plug into the ejector right here with this cord, but let's wait till after we've assembled the whole thing. Set the stacker portion to the left of the machine, lining up the grooves on this platform. Then these two handles slide right down inside. They just push right in. They don't screw it now, connect the ejector to the stacker. Stacker to the punch and the Palm switch to the ejector, and you're all set at this point, your Onyx setup should look like this, all lined up and ready to go.
Let's begin with the finishing touches on the stacker side of the module. The last two plastic panel screws go right here on the top, then the reception paper guide lines right up on that with these two screws and tighten them down. When that's down, couldn't tie it in place. The reception paper stop is then fastened to the guide.
And now moving over to the paper ejector side, the front and rear paper deflectors are to be installed. The front paper deflector goes right here underneath these two brass knobs tighten those down, and the rear paper deflector goes back here underneath these two brass knobs, and again, tighten those down. The two deflectors should be parallel and in there good and tight. There it is. Assembly is finished.
Now let's watch the whole system at work. On the left side of the stacker are three switches where you can disengage different parts the stacker side, whether or not you're using the paper stop with a foot pedal or portrait and landscape orientation. With these selections made, let's run a test paper first. Let's set it up. Let's punch a book using standard eigth and half by eleven paper using the screw in the back. Set the reception paper stop to the size paper you're using here, 11 inch you set it to paper inside, make sure the foam covered bar is about halfway up the paper. Next, we'll make adjustments to the stacker tray. These little knobs here pull right up so you can adjust the tray on the bottom. Pull it out to the size that you need. Place your paper down inside the top of the paper should go right along this edge of flying a adjust the drawer accordingly with that said, lock down the plastic knobs.
With this book, we'll be using a three to one pitch coil punch die, keeping an eye on the paper guides in the front you want to align the size of paper with this type of die that you're using. The style knob on the right side allows you to fine tune to get those lines exactly perfect. Drop your paper now in between the two paper guides into the throat of the machine, slide it to the right until it stops, and adjust this file. Stop and we're ready.
And everything works together to create your punch to book. Just watch the speed efficiency of this punch ejector and stacker system that is Rhin-O- Tuff Onyx APES 14 automatic paper ejector and stacker module. This is just one more part of the Rhin-O- Tuff Onyx series
Product Reviews
Write Your Own Review
Frequent Asked Questions
Submit a New Question


