We process your personal information to measure and improve our sites and service, to assist our marketing campaigns and to provide personalized content and advertising. By clicking the button on the right, you can exercise your privacy rights. For more information see our privacy notice.
Privacy Policy

Light Gold Metallic Laminating Toner Foil #GLD-05 (Price per Roll)
36.84
184.16
5
Light Gold Metallic Laminating Toner Foil #GLD-05 (Price per Roll)
- Color: Light Metallic Gold (GLD-05)
- Choose from several roll & core sizes
- Vibrant, high-contrast finish
- Sticks to dry toner prints when heat is applied
- Free Shipping $150+
Starting At:
$36.84
Choose Below


SWIPE FOR MORE IMAGES
- 0
- 1
- 2
- 3
- 4
- 5
- 6
- 7

Overview
Our light metallic gold foil offers the beauty of a traditional gold foil, with a slightly lighter hue while still having a high-contract finish. This special toner foil sticks to the dry toner¹ that is used in most copiers and select laser printers (does not work with wax-based inks*). They offer a consistent, solid color that can bring brilliance to invitations, greeting cards, business cards, artistic prints, and much more. Our foils are not the same as what you will find at the craft store; not only are they less expensive per square inch, they are of a much higher production-quality, so you can achieve a truly solid, professional foiled finish. Simply print your design, and use a heated foil or laminating machine to apply foil to the printing.
To Foil You Will Need:
• Foil Roll
• Heat Source (Pouch Laminator², Roll Laminator² or Fuser)
• Smooth Paper Stock³ Printed with Dry Toner
• Foil Roll
• Heat Source (Pouch Laminator², Roll Laminator² or Fuser)
• Smooth Paper Stock³ Printed with Dry Toner
Ready to add brilliance to your printed pages? You can buy light gold metallic foil fusing rolls in several different widths, lengths, and core sizes. Before you choose a roll size, make sure the core size and roll width match your machine. Widths can easily be cut shorter with the foil roll cutter, or we can affordably cut it for you (call (866) 537-2244 for a quote).
Specifications
| Item # | METALLICFOILLGD-GRP |
|---|---|
| Manufacturer | Binding101 |
| Manufacturer Item # | FM-MB-GLD-05 |
| Color | Light Gold Metallic (GLD-05) |
| Roll Size | Choose from Several Sizes 8" x 100', 12" x 100', 24" x 500', 12.6" x 984', 12" x 500' |
| Core Size | 1/2", 1", or 3" (Depending on Roll Size) |
| Foil Series | "R" Series |
| Quantity | 1 Roll |
| Shipping Weight (lbs) | 3, 5, or 8 lbs |
Description
What is foiling?
Foiling is the process of adding a metallic foil to paper to create a bright and vibrant finished piece. These reactive foil rolls feature a toner adhesive on the back that will stick to the dry toners used in most copiers and some laser printers*. These foil fusing rolls are perfect for DIY'ing your own wedding invitations, creating business cards that will really set you apart, making prints to frame and hang on the wall, and so much more. They are priced affordably compared to other brands, making them the premier choice for print production facilities and re-sellers --such as print and copy shops-- as well. But this affordability isn't just for businesses; many of our foiling customers are individuals who like to craft, as well as small business owners who sell prints on Etsy and other maker websites.
What machines can I use to foil?
Foiling is accomplished by using one of several methods. There are machines specifically designed for heat foiling in the professional market, as well as smaller work-around machines that can accomplish the job for individuals and smaller businesses who may not have the volume required to invest in a professional foil printmaking system. Just know that, when not using machinery designed for this process, there may be some fiddling with settings and additional testing required to achieve a solid print. You can review some of the types of machines that will foil below, as well as some of the features required of a compatible foil roll. Because foils come in specific sizes, and with specific core diameters, and in different compositions for different patterns, some machines may only be compatible with select foils.
Note: If you already have a laminator or other system and you want to test some foil before you buy a full roll, you can call us at (866)537-2244 to request a sample piece.
| Method/Machine | Pouch Laminator | Roll Laminator | Foil Fuser |
|---|---|---|---|
| Roll Size | Any Size. Pieces of foil are cut off the roll before applying. |
Varies on machine width | Varies on machine width |
| Core Size | Any Size. Pieces of foil are cut off the roll before applying |
Varies on machine core | May vary by machine; most use a 1" core roll |
| Heat | Minimum heat requirement: 300° F Higher is recommended Adjustable is recommended |
Minimum heat requirement: 300° F Higher is recommended |
N/A; Specifically made for foil rolls |
| Speed | Adjustable speed is highly recommended | Adjustable speed is highly recommended | N/A; Specifically made for foil rolls |
How do I use toner foil?
The method of foiling is going to depend entirely on the specific equipment you are using. Whether you are using an industrial foil fusing machine, a small office pouch laminator, or anything in between; the instructions for foiling will be completely reliant upon that.
You can apply foil using a pouch laminator by cutting a piece of the foil off of the roll, placing the foil over the desired location, inserting the paper and foil into a pouch carrier with scratch paper, and then running it through the pouch laminator. Applying foil in this manner applies brilliant metallic color foil to black and white toner copied or printed documents.
Binding101.com offers a variety of pouch laminators ranging from 4" up to 13" wide. For foiling at home or in the office, use the instructions below to help you get started. But remember; specific instructions will vary depending on your individual machine, the kind of foil you are using, etc., so you may need to make adjustments, perform tests, etc. And note that not all pouch laminators can foil, so you will want to ensure compatibility before you invest in a machine.
You Will Need:
-
-
Minimum 300° heat required (higher is recommended)
-
Recommended adjustable heat and speed settings (or at least one of these)
-
Must be able to handle 10 Mil Pouches
-
-
Laser printer or photocopier
-
Must use dry toner, and not wax-based inks (the foil will not adhere to waxed based inks)
-
-
Roll of toner reactive foil
-
Scissors
How to Foil:
- Warm-up your laminator. The temperature for foil fusing will need to be quite high (usually a minimum of 300° F, depending on the foil and your paper stock). It is a good idea to have enough material to do test runs and adjust the settings until you get the perfect foil since it can vary a bit depending on the kind of paper you use, the laminator itself, and the foil type.
- Print your document for foiling.
- Cut a piece of foil off the roll in the appropriate length and width for the portion of your design you want to be foiled.
- Place the piece of foil over the printed area and carefully put the item into a laminating pouch carrier. If the foil moves at this point the foiling process will not be successful so you will need to be careful. Place a piece of thin scratch paper on top of the foil. If foil goes over the paper, then you should also place a piece of scratch paper below your document.
- Now that your laminator is warmed up, feed the carrier through the laminator.
- Once the document comes out of the other side of your laminator, place it flat on a table. Resist the urge to immediately lift the carrier. Allow a moment for the pages to cool first, and then open the carrier, remove your scratch paper, and peel-up the foil sheet to reveal your beautifully foiled document.
All roll laminating machines will have the basic components required for a clean foil (including a minimum heat of 300° Fahrenheit, adjustable speed, and adjustable heat settings), so the compatibility really depends on one simple component of the machine: does it have a liner take-up? This is a requirement as the foil roll waste will need to be wound-up as it is running.
You Will Need:
-
-
Must have a liner take-up component
-
-
Laser printer or photocopier
-
Must use dry toner, and not wax-based inks (the foil will not adhere to waxed based inks)
-
-
Roll of toner reactive foil
How to Foil:
- Cut your roll with the foil roll cutter, if needed.
- Install the roll onto a compatible roll laminator & turn it on.
- Run your printed sheet through the machine.
- Peel off the foil to reveal your foiled design.
A foil fuser applies toner foil with a heated roller that is similar to the way a roll laminator applies laminating film. However, the foil only sticks to where there is dry toner. Using a Foil Fuser Machine to transfer metallic foil to documents makes the process more automated. Foil Fusers allow the user to use full rolls of foil instead of feeding individual cut sheets. If large jobs are in the schedule, Foil Fusers will greatly reduce the cost of foil and labor. They are easy to use & require no special training. They allow inexperienced operators to produce expert-looking projects in just minutes.
You Will Need:
-
-
Ensure the width will allow for the width of foil you use
-
-
Laser printer or photocopier
-
Must use dry toner, and not wax-based inks (the foil will not adhere to waxed based inks)
-
-
Roll of toner reactive foil
-
Foil roll cutter (only needed if you need to cut the roll width down to fit your machine)
How to Foil:
- Warm-up your laminator. The temperature for foil fusing will need to be quite high (usually a minimum of 300° F, depending on the foil and your paper stock). It is a good idea to have enough material to do test runs and adjust the settings until you get the perfect foil since it can vary a bit depending on the kind of paper you use, the laminator itself, and the foil type.
- Print your document for foiling.
- Cut a piece of foil off the roll in the appropriate length and width for the portion of your design you want to be foiled.
- Place the piece of foil over the printed area and carefully put the item into a laminating pouch carrier. If the foil moves at this point the foiling process will not be successful so you will need to be careful. Place a piece of thin scratch paper on top of the foil. If foil goes over the paper, then you should also place a piece of scratch paper below your document.
- Now that your laminator is warmed up, feed the carrier through the laminator.
- Once the document comes out of the other side of your laminator, place it flat on a table. Resist the urge to immediately lift the carrier. Allow a moment for the pages to cool first, and then open the carrier, remove your scratch paper, and peel-up the foil sheet to reveal your beautifully foiled document.
How much does it cost to foil?
The exact price to foil is going to vary depending on several factors, including the printer and toner you use, the laminator or foil fuser, the style of foil, the method (laminator or fusing), the paper stock, etc. But in general, users can expect to pay only about $0.04-$0.08 per 8.5" x 11" letter size page.
Can I use more than 1 color on a page?
Yes! If using the pouch laminator method, you have total control over where the foil lies on your sheet, so you can use as many or as few colors as you would like by just cutting the pieces and placing them on the toner. If using a foil fuser, you would want to print your first toner, run it with color number 1, then add your second toner and run it with foil number 2.
Resources
Need a bit more info not found here? Here are some popular links withmore information about toner foiling, including a full list of FAQs, troubleshooting tips for users encountering issues, and some top-secret tips to ensure perfect adhesion, every time.
¹ The adhesive on the back of these foil rolls sticks to dry toner only; it will not work with wax-based inks from laser printers.
² Compatible pouch laminators require certain features; they must be able to reach at least 300°F, have adjustable speed and temperature settings, and be the proper width for your machine. If using a roll laminator, the machine must also have a film rewind feature and a matching core size. Other variables may factor into compatibility. Click here to see a list of laminators tested and approved for foiling.
³ The adhesive applies well to smooth paper stocks of a variety of thicknesses. It does not, however, create a solid/consistent look on textured papers.
Videos
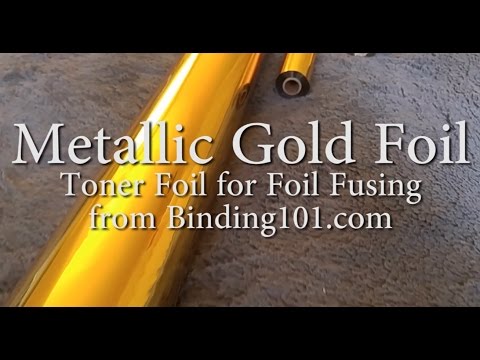
Metallic Gold Toner Foil
Transcript:
Featured in this video is our most popular toner foil color, Metallic Gold! Watch how this shimmery foil reflects and shines in the light, and see what you can do with gold toner foil in this short video.
Featured in this video is our most popular toner foil color, Metallic Gold! Watch how this shimmery foil reflects and shines in the light, and see what you can do with gold toner foil in this short video.

Gold Foil Comparison
Transcript:
In this video we show you the four different "gold" options we offer, moving it slightly in the light so that you can see the variations and how each color changes as it reflects. We offer gold metallic foil in a basic metallic gold foil, a matte gold foil for a little less shimmer, a light gold foil for a slightly brighter look, and a rose gold 70 foil that has just a hint of pink.
In this video we show you the four different "gold" options we offer, moving it slightly in the light so that you can see the variations and how each color changes as it reflects. We offer gold metallic foil in a basic metallic gold foil, a matte gold foil for a little less shimmer, a light gold foil for a slightly brighter look, and a rose gold 70 foil that has just a hint of pink.
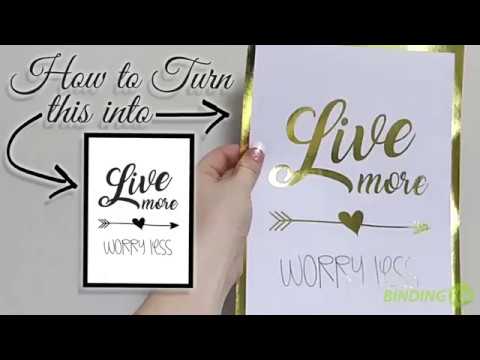
How to Foil with a Pouch Laminator
Transcript:
Hi, my name is Mallory, and today I am going to show you how to turn a printed sheet into a gorgeous foiled print using a pouch laminator.
Ok, so the first thing you need to do it print the design you want to foil. It needs to be printed using a dry toner ink onto a smooth paper stock. Thicker paper like cardstock works fine, as long as there is no texture and the ink used is a dry toner (not an inkjet or other wax-based ink).
You are also going to need a pouch carrier, which is this fold... Read More
Hi, my name is Mallory, and today I am going to show you how to turn a printed sheet into a gorgeous foiled print using a pouch laminator.
Ok, so the first thing you need to do it print the design you want to foil. It needs to be printed using a dry toner ink onto a smooth paper stock. Thicker paper like cardstock works fine, as long as there is no texture and the ink used is a dry toner (not an inkjet or other wax-based ink).
You are also going to need a pouch carrier, which is this folder here. This is going to protect your laminator.
Now place your printed sheet onto the pouch carrier, and lay your foil roll over your design. Make sure all the ink that you want to foil is covered. Next, cut your foil to fit the design.
Place the foil with the non-colored, gray side down over the portion of your design that you want to foil.
So I’ve trimmed my foil, and now I am going to place a piece of scrap paper on top of the foil to prevent it from transferring onto my carrier. If your foil overlaps your printed sheet, you can also place a piece of scrap paper below your design.
Now bring it over to your pouch laminator, which should be pre-heated. The temperature to use is going to vary quite a bit, depending on the supplies you are using, including the paper thickness, the laminator, and even the foil itself, because some colors need a little extra heat. You may need to do some testing before you can get the perfect finish, so be sure to have plenty of printed sheets to work with.
I am using the professional, James Burn SpeedyLam 330R, set to 150 degrees Celsius (or about 300 degrees Fahrenheit) using a speed setting of 2. Other laminators may work as well, but there are a couple things you need to keep in mind… they need to have adjustable heat and adjustable speed settings in order to work. They also have to hit really hot temperatures, the minimum typically being about 300 degrees Fahrenheit (but again, that will vary depending on several factors, which is why adjustable heat is necessary). It also needs to be able to handle a 10 mil thick pouch minimum, since we are using a thick pouch carrier and scrap paper.
If you’re using one of the smaller home office pouch laminators, it might still work, you may just have to run it through more than once to get the foil to stick.
So we’re going to lay our carrier flat and open it up. There may be some static, which for me lifted up my scrap paper. You can kind of see where it grabbed the design here. Now find an edge and peel it up.
This is my favorite part...Voilah! You’re done.
The color used is our regular metallic gold, which is our most popular. We have several other golds available, including matte gold and rose gold too. Plus a ton of other colors, holographic patterns, iridescent rainbow colors, and more.
You can see here that I should have placed a piece of scrap paper below my design, because my foil overlapped my print and stuck onto my pouch carrier.
Thanks so much for watching, I hope you enjoyed this video. Be sure to subscribe to our YouTube channel for more foiling videos, as well as a ton of other videos about all the products that we have to offer at Binding101.com
_____________________________________________________________
PACIFIC SUN by Nicolai Heidlas Music https://soundcloud.com/nicolai-heidlas
Creative Commons — Attribution 3.0 Unported— CC BY 3.0 http://creativecommons.org/licenses/b...
Music promoted by Audio Library https://youtu.be/kbqmEJTr3nU
Frequent Asked Questions
Q
Tips for storing the foils?
Asked by Jessica
A
We keep our foil in a cool dark room. The foil room only has 1 light on and that is over the work surface. We keep the temperature between 67 and 73 degrees with low humidity all year long. The darkroom helps keep the foil from fading.
Answer by Binding101
Submit a New Question


