We process your personal information to measure and improve our sites and service, to assist our marketing campaigns and to provide personalized content and advertising. By clicking the button on the right, you can exercise your privacy rights. For more information see our privacy notice.
Privacy Policy

All About Wire-O Binding
June 07, 2018

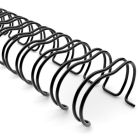
Books that are bound with Wire-O (also known as double o wire or twin loop wire) use a continuous hinge of double loops of wire to hold the book covers and pages together. Wire binding is popular among graphic designers & offers a stylish metal finish. This traditional method of binding secures pages so that they cannot be modified without de-binding the book. Books bound with Wire-O Looped Wire lay flat and the sheets are able to turn 360°, making it the perfect solution for calendars and notebooks. Holes are available in round and square, and 3:1 or 2:1 pitch (holes per inch). The Wire-O supplies are available in 10 different colors and sizes ranging from 1/4" up to 1-1/4", and can even be purchased on spools. The wire can be bent out of shape so this is not the favorable choice for heavy usage and or mailing.
Wire-O Finishing Advantages
-
• Pages turn easily, lay flat, and stay flat.
• Facing pages remain in perfect registration and open a full 360° (front-to-back).
• Available in spools, pre-cut/standard lengths, and custom cut lengths.
• A wide selection of standard colors of Wire-O® are available in diameters from 1/4" up to 1-1/4".
Wire-O Finishing Limitations:
-
• Will crush under pressure.
• Cannot re-use binding supplies once de-bound.
• Higher cost than other methods.
• Requires two hole patterns to be able to bind a full range of sizes.
Wire-O Applications:
-
• Brochures
• Reports
• Manuals
• Calendars
• Notebooks
• Marketing material
• Photo albums
• Scrapbooks
• and More...
What You Need to Bind with Wire-O:
-
• A Wire Binding Machine.
• A Wire Closer (if not included with you binding machine).
• Wire-O Binding Supplies.
• Presentation Covers (optional).
How to Bind with Wire-O:
-
• Position the paper guide on your binding machine based on your desired paper size. Gather your printed sheets and insert the allotted amount of paper into the opening. When the paper is fully inserted, slide the stack to the left until it makes contact with the paper guide. To make sure all of the edges of the sheets are flush, tap the sides of the stack. Activate the punching by using the pull handle, push button, or foot pedal on your binding machine.
• Arrange your sheets in the desired order. Flip the back cover so that it is on the front of the arrangement. The inside of your back cover should now be the first sheet in your arrangement. You will see in later steps that this will hide the wire spine, making the appearance more professional.
• Set your Wire Closer to the appropriate Wire-O size that you are using. Set the edge of your book with the wire into the wire closer opening. Pull the wire closer handle to close and secure the wire around you book.
• Flip the top sheet (your back cover) to the back of the book to hide the spine and see your completed Wire-O Book.


Hi! My name is Mallory and I have been in the industry since 2008. If you do the math, that is over 15 years. I have spent my time at Binding101 in many roles, including customer service, sales, e-commerce management, video production, and more! Because of this vast experience, I bring a truly expert touch to the content in our blog. widdling down complex topics to extract what our customers really want to know. As the Content and UX Manager, I act as a writer and editor for the majority of copy you will find here. When not at my computer, I love spending time binging stand-up comedy, baking, and cuddling up with my family and rescued cats and dogs...
Related Products

Comment(s)


Trending Now

How to Bind Paper
January 29, 2019

What are the Best Laminators for Foiling?
July 10, 2018
How to Make a Wire Calendar 3 Different Ways
September 04, 2018
Everything you need to know about Foiling (with FAQs)
June 22, 2018
