We process your personal information to measure and improve our sites and service, to assist our marketing campaigns and to provide personalized content and advertising. By clicking the button on the right, you can exercise your privacy rights. For more information see our privacy notice.
Privacy Policy

Royal Sovereign RSH-380SL 15" Tabletop Roll Laminator (Discontinued)
2618.79
NewCondition
InStock
Royal Sovereign RSH-380SL 15" Tabletop Roll Laminator (Discontinued)


SWIPE FOR MORE IMAGES
- 0
- 1
- 2
- 3
- 4
- 5

Overview
The Royal Sovereign RSH-380SL roll laminator is an innovative machine in its ability to pack a high speed and professional-quality lamination into such a small package. This laminator is small enough to easily fit on almost any tabletop, and will laminate the most popular office document sizes up to 15" wide in any mil thickness of film. It will also mount foam boards up to 1/4" thick, and features adjustable heat and speed settings with 9 pre-set options. The 380-SL has a unique de-curling feature that also offers the same great quality for single-side laminating, offering a flatter output. All of these features, plus the ability to run at speeds up to 14.8 feet per minute, make the RSH-380 SL a great choice for shorter run prints, signage, presentations, menus, price sheets, and any other smaller documents your business creates.
• Capable Laminating & Mounting
• Variable Speed & Heat Settings
• Auto-Grip for 2.25" and 3" Core Films (1" Adapter is an add-on Optional)
• Front Feeder & Rear Wind-Up Assembly
• Mounts up to 1/4" Thick Boards
• 14.8 Feet / Minute Maximum Speed
• De-Curling Device
• Variable Speed & Heat Settings
• Auto-Grip for 2.25" and 3" Core Films (1" Adapter is an add-on Optional)
• Front Feeder & Rear Wind-Up Assembly
• Mounts up to 1/4" Thick Boards
• 14.8 Feet / Minute Maximum Speed
• De-Curling Device
Specifications
| Item # | 04RSL380SL |
|---|---|
| Manufacturer | Royal Sovereign |
| Manufacturer Part Number | RSH 380SL |
| UPC/EIN | 849023070160 |
| Compatible Supplies & Accessories | Thermal Laminating Film (15" Max Width, 2.25" or 3" Core, 7.9" Max Roll Diameter) Optional 1" Core Adapter Available by-Request |
| Power Voltage | AC 120V, 60Hz, 1200W |
| Dimensions | 21.5" x 25" x 18" |
| Certifications | CE |
| Manufacturer's Warranty | 1 Year Limited (Parts & Labor), 6 Month Rollers |
| Size | 15" |
| Color | Gray |
| Operation | Electric |
| Double-Sided Lamination | Yes |
| Single-Sided Lamination | Yes |
| Thermal Laminating | Yes |
| Digital Laminating (Low-Temp) | No |
| Cold Laminating | No |
| Speed | 14.8' / Min (Feet per Minute) |
| Adjustable Speed | Yes (9 Settings) |
| Heating Type | Silicone Rollers |
| Warm-Up Time | 8 Minutes |
| Maximum Mil Thickness | 10 Mil |
| Temperature Range | 230° - 320°F (110° - 150°C) |
| Adjustable Temp | Yes (Digital; 9 Settings) |
| Maximum Roll Length | Maximum of 7.9" Roll Diameter |
| Core Size | Works with 2.25" and 3" Core Films |
| Reverse Function | Yes |
| Capable of Mounting | Yes |
| Maximum Mounting Thickness | 1/4" Boards |
| Integrated Cutter | Yes |
| Stand-By / Power-Save Mode | Yes (30 Minutes of Inactivity; 176°F Hold Temperature) |
| Auto-Shut Off | Yes (60 Minutes After Standby Activated) |
| Shipping Weight (lbs) | 102 |
| Product Weight (lbs) | 91 |
| Shipping Dimensions | 31.5" x 29.5" x 26" |
| Shipping Information | This item ships via Truck (Common Carrier). It is the responsibility of the Consignee (receiver) to remove the product from the truck. If you do not have a loading dock or any other means to lift the freight off the truck and/or you need assistance bringing the product inside of your location please call (866) 537-2244. Click here for full details. |
Description
If you need a professional quality lamination for your smaller documents, and you're tired of spending a ton (and waiting for the job to finish) at your outsourcing supply shop, then the Royal Sovereign RSH-380SL may be a great fit for your business. This 15" tabletop laminator runs with four high-quality silicone rollers that offer consistent heat from edge to edge. Nine heat settings allow you to adjust the temperature to fit your specific application requirements. The speed is also adjustable with nine settings, and can run at up to a maximum of 14.8 feet per minute. This speed is unheard of in desktop design lamination machines, and sometimes even in larger format solutions.
The RSH-380SL expands it capabilities further by allowing for mounting boards up to 1/4" thick, single-side laminatation with a de-curling function, and accepting lamination films with either a 2.25" or 3" core with auto-grip hubs (it can even also accept 1" cores with an optional 1" core adapter). This array of features makes for a truly professional and versatile machine, making it ideal for businesses of all kinds that need to laminate standard-size documents up to fifteen inches wide.
How to Double-Side Laminate with the RSH-380SL
Basic operation of this unit is fairly easy to achieve. Be sure to check out our videos tab to watch the process. This information is also available in the instruction manual, with drawings and pictures.
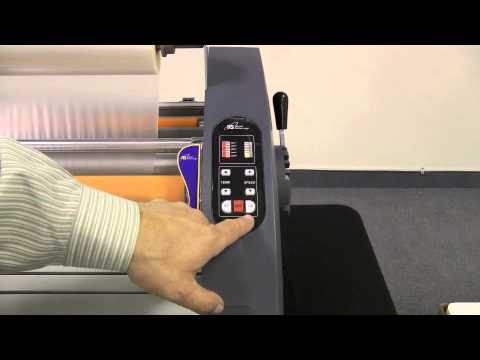
- Turn the power switch on ("I" position). Power switch is located in the rear of the unit on the left side.
- Turn on the lower hot roller by pressing S/D button on the control panel. This button will be lit when the lower heat is on.
- Complete the "Loading Film" steps as shown on page
- Set the temperature and speed according to the Recommended Temperature and Speed section.
- Remove the Front Table.
- Pull down the upper film over the Safety Cover to the lower film; align and center the lower film to upper film
- Rewind the upper film until the film aligns with the Safety Cover.
- Thread the film under the Upper Idle Bar and underneath the Safety Cover until the film rests on the upper roller
- Carefully pull up the laminate from the lower roll up towards the first idle bar and then around the back side of the second Idler (Caution: lower roller may be hot)
- Tack the lower film to the upper film that is resting on the main hot rollers
- Reinstall the Front Table and close the Safety Cover.
- Adjust the nip setting to 1/4'' (6mm).
- Insert and push the leader board into the hot rollers
- Adjust the nip setting to "Laminating" mode.
- Push the Run button.
- Press the Run button and adjust the supply roll tension knobs by rotating clockwise or counterclockwise. Turn it until the supply roll films have some resistance (the tension varies depending on the film thickness; the thicker the film the more tension is required)
- Press Stop button when the leader board has completely exited the rear of the unit.
- Use the Cross Cutter to cut the leader board from the web
- Peel Trim any excess film off of the leader board edges. The leader board can be reused
- Set the roller nip setting to the appropriate position for the lamination or encapsulation application
How to Single-Side Laminate with the RSH-380SL
Single side lamination is easily achieved with this unit. All it takes is a few adjustments to the winding/webbing process of your film, a large piece of kraft paper (or similar), and no tools or complicated instructions. Be sure to check out our videos tab to watch the process/
- Turn the power switch on ("I" position). Power switch is located in the rear of the unit on the left side.
- Follow the steps in the "Loading Film" procedure by loading the upper shaft with OPP Film (see user manual).
- Set the temperature and speed as shown as the recommended in page 13.
- Center the OPP film.
- Thread the film under the Upper Idle Bar and underneath the Safety Cover until the film rests on the upper hot roller.
- Pull a sheet of A3 paper into the laminating roller and pass under the idle-bar and over the shaft de-curling bar. Make sure the idle-bar being in the lower location while laminating.
- Link the paper to the film.
- Adjust the nip setting to "Laminating" mode.
- Press the run button and adjust the supply roll tension knobs by rotating clockwise or counterclockwise. Turn it until the supply roll films have some resistance(the tension varies depending on the film thickness: the thicker the film the more tensions is required)
- Stop the laminator when all of the laminated items have completely exited the rear of the machine.
RSH-380SL Troubleshooting
The most common issues users may encounter are easily resolved with these troubleshooting tips. Remember to always refer to the user manual and your warranty details before performing maintenance or repairs, or contact an authorized service provider or trained mechanic.
| Problem | Cause | Solution |
|---|---|---|
| Machine won't turn on | a. Power switch is off / set to "0" b. Tripped circuit breaker c. Blown main power fuse |
a. Turn on the power / set to "I" b. Reset the circuit breaker c. Replace the fuse |
| There is power, but the rollers are not turning |
a. Run switch is not set to "on" b. Safety cover is not closed c. Blown motor fuse |
a. Press "run" to turn on b. Close the cover to activate the switch c. Replace the fuse |
| Machine not heating up | Call your authorized dealer | |
| Curled lamination | a. Upward curl b. Downward Curl |
a. Loosen the top roll tension b. Loosen the bottom roll tension Make sure the lamination is wound properly with the de-curling bar |
| Cloudy lamination | Temperature is too cold or speed is too fast |
Increase the heat or slow down the speed |
Videos

Single Side Laminating
Transcript:
This video will take you through how to do single sided thermal laminating on a Royal Sovereign 15 inch RSH-380SL single and double sided thermal roll laminator with de-curler bar.
1. Remove the feed table.
2. Take your installed film underneath the idle bar, and then over the top roller.
3. Replace the feed table.
4. Make sure the film does not go past the nip.
5. Take a piece of kraft paper or thin material and run it into the nip of the roller. From the back side of the machine, run th... Read More
This video will take you through how to do single sided thermal laminating on a Royal Sovereign 15 inch RSH-380SL single and double sided thermal roll laminator with de-curler bar.
1. Remove the feed table.
2. Take your installed film underneath the idle bar, and then over the top roller.
3. Replace the feed table.
4. Make sure the film does not go past the nip.
5. Take a piece of kraft paper or thin material and run it into the nip of the roller. From the back side of the machine, run that paper under the idle bar, over top of the de-curler, and then in between the back rollers and out the back of the laminator.
6. From the front of the laminator, marry the paper to the laminate.
7. Pull it tight and close the shield.
8. Pull the kraft paper out more to straighten the film (make sure you leave some of the paper visible on the front of the laminator).
9. Then close the nip of the rollers and run your documents.
Double Sided Laminating
Transcript:
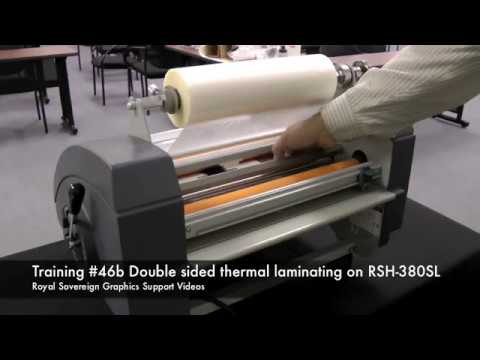
This video will take you through how to do double sided thermal laminating on a Royal Sovereign 15" RSH-380SL single and double sided thermal roll laminator with de-curler bar. The material that we’re going to be running today has 1” core so we’re going to have change the adaptors to the 1” core adapters from the ones that are supplied with the machine.
1. These are the 2.25” adapters. What we need to do is take our wrench, loosen up the adapters by turning out these screws, and sli... Read More
1. These are the 2.25” adapters. What we need to do is take our wrench, loosen up the adapters by turning out these screws, and sli... Read More
This video will take you through how to do double sided thermal laminating on a Royal Sovereign 15" RSH-380SL single and double sided thermal roll laminator with de-curler bar. The material that we’re going to be running today has 1” core so we’re going to have change the adaptors to the 1” core adapters from the ones that are supplied with the machine.
1. These are the 2.25” adapters. What we need to do is take our wrench, loosen up the adapters by turning out these screws, and sliding this off. Next, we’ll put one of our adapters on to the 1” core.
2. Put it down. Take a roll of film. Make sure that it’s going to come off the film so the adhesive on the film which is inside the roll here is going to come over the roller here and not touch the roller, just the polyester on the outside. That locks into there. You take one through the other side. Slide it in.
3. And position it on the laminator. We’re also going to do the same thing on the bottom.
4. Okay, now we need to web the laminator. First we take off the feed table.
5. We’re going to take our film. Go underneath the idler bar. Take the safety cover, bring the film underneath, pull it out, and bring it over the two rollers.
6.Now that we have the laminator on, it’s activating the film and the adhesive is melting. We’re going to take our bottom roll of film. It needs to go underneath the bottom idler.
7. You want to make sure that our two rolls are lined up with each other. And then we’re going to take our film and fuse it to the top roll.
8. Now we’re going to take our table, put it back in. Drop our safety cover. We want to make sure that our laminator right now is in the open, the rollers are open. We want to bring it to the lamination mode so the two rollers are together.
9. And take our leader board, hit run on the laminator and we’re going to pull the film through the laminator. Make sure it goes between the two rollers in the back and out the other side.
10. And trim the film off.
Now you’re ready to laminate.The film that we’re running today, we’re going to be running 230 degrees at speed 3. We’re going to depress the run button so our film runs through the laminator. We’re going to take our images and feed them into the laminator. Once our prints are through, we’ll hit the stop button and we can remove our documents by taking our rear blade and cutting the material off.
How to Unpack and Install
Transcript:
This video will take you through how to unpack and install the Royal Sovereign 15" RSH-380SL single and double sided thermal roll laminator with decurler bar.
This video will take you through how to unpack and install the Royal Sovereign 15" RSH-380SL single and double sided thermal roll laminator with decurler bar.
Product Reviews
Write Your Own Review
Frequent Asked Questions
Q
Can it do cold laminating?
Asked by Customer
A
Unfortunately, no. The RSH-380SL does not allow for cold lamination.
Answer by Binding101
Q
How will it work with a 1" core film?
Asked by Customer
A
An optional adapter is available by-request that will allow for compatibility with 1" core laminates. Removing and adding the adapter is fairly simple, requiring only a wrench and a few steps.
Answer by Binding101
Submit a New Question


