D&K Expression 42 Plus (EXP 42 Plus) 42" Roll Laminator with Stand & PSA Rewind
9359 NewCondition InStock

D&K Expression 42 Plus (EXP 42 Plus) 42" Roll Laminator with Stand & PSA Rewind

Item #: 04DKEXP42PSR
Brand: D&K
  • Operation: Electric
  • Speed: 0 -10 fpm
  • Temperature Range: Up to 300
  • Maximum Mounting Thickness: 1/2" Boards
  • 1 Year Manufacturer Warranty
  • Price Match Guarantee!
  • Oversize / Truck Shipping
  • Brand New

$9,359.00

Buy Now, Pay Later
Starting at $866/monthLearn More >

SWIPE FOR MORE IMAGES
  • 0
  • 1
  • 2
  • 3
video

Overview

The D&K EXP 42 Plus is a heavy duty, industrial strength wide format thermal roll laminator. It is designed for multi-purpose laminating and mounting of prints up to 41" wide, and accommodates substrates up to 1/2″ thick. It is featured with variable speed, heated rollers, stand, and release liner rewind.

Specifications

Item # 04DKEXP42PSR
Manufacturer D&K Group, Inc.
Included Supplies & Accessories Stand
Foot Switch
Slitter kit
Release Liner Rewind for PSA Films
Fan Bank
Variable Speed Motors
Self-locking Supply Shafts
Power Voltage 230V 60Hz 30 A 1Pz
Speed 0 -10 fpm
Castors Yes
Dimensions 19 1/4" H x 57" W x 27-1/2" D
Manufacturer's Warranty 1 Year Limited
Country of Manufacture USA
Operation Electric
Thermal Laminating Yes
Digital Laminating (Low-Temp) Yes
Cold Laminating Yes
Speed 0 -10 fpm
Adjustable Speed Yes
Temperature Range Up to 300°F
Adjustable Temp Yes
Maximum Width 41"
Capable of Mounting Yes
Maximum Mounting Thickness 1/2" Boards
Liner Take-Up Yes
Mounted Onto Stand Yes
Shipping Weight (lbs) 420
Product Weight (lbs) 205 (Minus Stand)

Description

The D&K EXP 42 Plus is a heavy duty, industrial strength wide format thermal roll laminator. It is designed for multi-purpose laminating and mounting of prints up to 41" wide, and accommodates substrates up to 1/2″ thick. This wide format laminator includes a foot pedal, slitter kit, and release liner rewind (takeup) for laminating pressure sensitive films, stand with castors, fan bank for cooling thermal films, variable speed motors, and self-locking supply shafts. This D&K EXP 42 Plus 42" Thermal Laminator is your perfect companion for all your print finishing needs.

Features:

  • Laminate/encapsulate and mount prints up to 41” wide.
  • Independent upper and lower temperature adjustments up to 300° F.
  • Fast set-up and easy operation.
  • Roller lift for easy film loading
  • In-line slitter for trimming during lamination.
  • Variable roller pressure
  • Heavy duty stand with castors for easy mobility and offers the ideal height for operator comfort.
  • Accepts and designed for mounting and laminating low-melt, thermal and pressure sensitive films
  • Accommodates substrates up to 1/2″ thick.
  • Accomodates rolls up to 8" in diameter
  • Ready and wait lights indicate when laminator has reached preset temperatures.
  • Independent upper and lower electronic temperature controls with LED display.
  • Spring-Loaded adjustable pressure on laminating and pull rollers for smooth and even lamination.
  • Footswitch allows hands free operation for guiding materials during lamination.
  • Auto-grip shafts for easy loading of film.
  • Heated Rollers for a variety of films and scratch free graphics.
  • Heavy-Duty forward/reverse variable speed motor
  • Sturdy feed-back table with adjustable feed guide
  • Heavy-duty top grade silicone rubber rollers
  • Heavy duty chain and sprocket drive
  • Four high-capacity forced air cooling fans.
  • Made in the USA

Videos

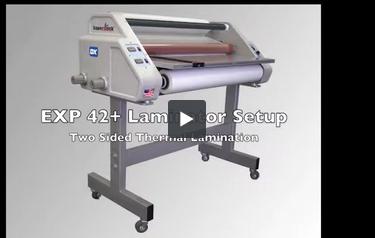
How to Setup and Operate an EXP 42 Plus for Wide Format Thermal Lamination Demo Videos

Transcript: Before using a laminator, be aware of all necessary safety precautions and operating procedures. Consult the owner's manual to familiarize yourself with the machine before use to begin using your exp 42 plus laminator. First plug in the power cord, the plug should be inserted straight and then twisted to the right to lock into the outlet. Next turn on the power switch located on the back of the laminator. You can preheat your laminator before loading film supplies. To do this, flip the temperatu... Read More
Before using a laminator, be aware of all necessary safety precautions and operating procedures. Consult the owner's manual to familiarize yourself with the machine before use to begin using your exp 42 plus laminator. First plug in the power cord, the plug should be inserted straight and then twisted to the right to lock into the outlet. Next turn on the power switch located on the back of the laminator. You can preheat your laminator before loading film supplies. To do this, flip the temperature switches on the left control panel to the up or on position. Push the grain select button on the temperature control pads and press the Up or Down Arrow keys until you reach the desired temperature. Closing and slowly rotating the rollers while the laminator warms up will help provide even and consistent heat across the width of the machine. The rollers can be closed by pulling out the pressure adjustment knobs on the left side of the laminator. Turn the knobs to the left to lower the rollers and apply pressure, or to the right to raise the rollers and decrease pressure. Speeds are adjusted by a simple turn knob located on the right control panel. Make sure the top directional switch is turned to the up or forward position, turn the speed control knob right to increase speeds up to 10 feet per minute. Decrease laminator speeds by turning the control knob left when the laminator is heated and ready to load, turn the speed control knob all the way to the left to stop the rollers, remove the print feed table and finger guard. We'll start by loading the top supply mandrel. The film supply mandrels on this laminator feature a break mechanism on the right hand side. This mechanism adjusts the film tension in order to remove wrinkles and lay the film down in the best possible manner. Take the supply mandrel off the laminator and insert it through the core of the laminating film. The film should hang down from the back side of the roll with the adhesive facing towards you. Place the mandrel back on the laminator and repeat the process with the bottom roll. In this case, the film should hang off the front of the roll with the adhesive side facing away from you, towards the laminator center the rolls of film on the supply mantrels and line up the edges so that the two films meet up as best as possible. Use a ruler if necessary to ensure proper alignment of the top and bottom supply rolls. Once the supply rolls are in place, thread the top roll under the black idler bar and lay it over the upper nip roller. The blank Idler Bar brings the film into contact with the heated roller at an earlier point to allow for more dwell time, or time for the adhesive to heat up to its proper activation temperature. Next, thread the bottom film under the lower black idler bar and lightly tack it to the top film that is hanging down past the nip rollers. Once the films are bonded together, push the lower idler bar back and up until it falls into position, place the feed table and finger guard back onto the laminator, you may wish to turn on the laminators fan bank to cool off hot films as they exit the machine. Use a threading board to insert the films into the nip rollers. Push the threading board against the laminating films and turn the nip roller control to a slow speed. The laminating films and leader will begin moving through the machine until they exit through the rear pole rollers, if you observe any wrinkles on the laminating films as they pass over the nip rollers increase the tension on the supply shafts by turning the brake mechanism forward or away from it. Only apply as much tension as needed to smooth out the wrinkles, use the ruler decals on the feed table to center your print in the middle of the laminator. Make sure that the print is completely perpendicular to the nip rollers. Use the adjustable print feed guide on the table if desired. While the nip rollers are rotating gently feed the print into the laminator until it catches. The print will run through the laminator and exit out the rear. Once your print has cleared the pole, rollers turn off the speed control. Use the metal cutting guide directly behind the pole rollers to cut the laminating film and separate the print from the laminator. You can then perform any additional trimming or post lamination finishing steps as needed. When you have finished laminating, raise the nip and pull rollers so that they are no longer touching, leaving stationary rollers under pressure for long periods of time may cause them to develop flat spots. You may leave the film supplies loaded on the laminator until you are ready to use them again. If you need to change out materials, simply cut each laminating film before it enters the nip rollers. If adhesive has transferred to the nip rollers, use a D and K roll cleaner to remove the residue. The roll cleaner works like an eraser by rubbing off adhesive from the silicone rollers without the use of chemicals, turn off the power switch on the laminator. After use, the power cord can remain in the outlet or can be unplugged if desired. For more information, refer to the owner's manual that is included with Each machine. Or visit D and K's website@ www.dkgroup.com .

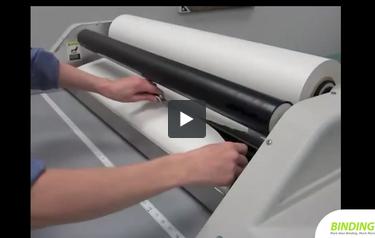
How to Mount Photo Prints to Foam Board (Rigid Mounting) Demo Video

Transcript: After you have pre coated your boards, cut the mounting adhesive on the laminator before it enters the nip rollers, remove any remaining material from the laminator to mount your print to the board. Peel back approximately two to four inches of the adhesive liner from the front edge of the board. Press down, increase the liner to create a small hinge. Position your print on the board. The hinge should allow you to align everything properly until you are ready to mount once the print is in place.... Read More
After you have pre coated your boards, cut the mounting adhesive on the laminator before it enters the nip rollers, remove any remaining material from the laminator to mount your print to the board. Peel back approximately two to four inches of the adhesive liner from the front edge of the board. Press down, increase the liner to create a small hinge. Position your print on the board. The hinge should allow you to align everything properly until you are ready to mount once the print is in place. Lightly press down to adhere it to the center of the exposed adhesive. Start in the middle and use your fingers to press down the rest of the leading edge of the print. Place the board on the laminators, feed table and lay the print over the nip rollers so that it is out of the way. Firmly grab the liner hinge and turn on the rollers to a slow speed. The board will begin moving through the laminator. While it is moving, pull back on the liner hinge to remove it and expose the adhesive on the board. The print will mount to the board as it passes through the nip rollers once it exits the machine, perform any necessary trimming or post laminating steps. You now have an image permanently mounted to a board that is suitable for display. For more information, speak with the DK lamination expert or visit the website@www.dkgroup.com.

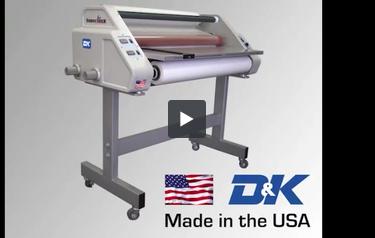
D&K EXP 42+ Wide Format Laminator Demo Video

Transcript: In mounting images to a rigid substrate such as foam board, is a simple and profitable procedure that you can perform on the encase exp 42 plus laminator images can be mounted in a variety of ways. In this video, we will demonstrate how to create an adhesive coated board and then mount a printed image to the substrate. Mounting is generally a two step process. In the first step, we will set up the laminator to apply a pressure sensitive mounting adhesive to foam board. This is frequently referre... Read More
In mounting images to a rigid substrate such as foam board, is a simple and profitable procedure that you can perform on the encase exp 42 plus laminator images can be mounted in a variety of ways. In this video, we will demonstrate how to create an adhesive coated board and then mount a printed image to the substrate. Mounting is generally a two step process. In the first step, we will set up the laminator to apply a pressure sensitive mounting adhesive to foam board. This is frequently referred to as pre coating a board. No heat is required during this process. First remove the finger guard from the laminator. The nip roller should be fully open and stationary. Place your mounting adhesive on the laminators, top supply mandrel. The roll should unwind from the back with the exposed adhesive surface facing you begin unwinding the adhesive until you have enough material to lay over the top nip roller. The adhesive should go above the blank idler bar and over the nip roller. Do not throw the adhesive under the Idler Bar in this setup. Next, take a scrap piece of material that is the same thickness as the board you are coating. The scrap material is sometimes referred to as a leader. Use this leader to push the mounting adhesive into the nip rollers. Once the leader and adhesive are in position, lower the top laminator roller until it contacts the leader, apply additional pressure by rotating the pressure adjustment knob approximately one quarter turn left. The pole rollers should be set to the thickness of your board, in this case, 316, of an inch. Replace the finger guard on the laminator and position your board on the feed table directly behind the leader. The front edge of the board should touch the back of the leader. Turn on the motor to a slow speed and begin feeding the leader and board through the machine. If the adhesive is not laying down flat, increase tension on the adhesive supply roll by turning the brake mechanism forward or away from you. You can process multiple boards at a time by feeding one directly behind another. Once the boards exit the back of the laminator, use a razor to separate them. You may need to trim any overhanging adhesive from the boards. You now have a pre coated adhesive board that is protected by a removable liner. After you have pre coated your boards, cut the mounting adhesive on the laminator before it enters the nip rollers. Remove any remaining material from the laminator to mount your print to the board, peel back approximately two to four inches of the adhesive liner from the front edge of the board. Press down, increase the liner to create a small hinge. Position your print on the board. The hinge should allow you to align everything properly until you are ready to mount. Once the print is in place, lightly press down to adhere it to the center of the exposed adhesive. Start in the middle and use your fingers to press down the rest of the leading edge of the print. Place the board on the laminators, feed table and lay the print over the nip rollers so that it is out of the way. Firmly grab the liner hinge and turn on the rollers to a slow speed, the board will begin moving through the laminator. While it is moving, pull back on the liner hinge to remove it and expose the adhesive on the board. The print will mount to the board as it passes through the nip rollers. Once it exits the machine, perform any necessary trimming or post laminating steps. You now have an image permanently mounted to a board that is suitable for display. For more information, speak with the DK lamination expert or visit the website@www.dkgroup.com

Product Reviews

Write Your Own Review
You're reviewing:D&K Expression 42 Plus (EXP 42 Plus) 42" Roll Laminator with Stand & PSA Rewind
Your Rating

Frequent Asked Questions

Submit a New Question

Request Code