We process your personal information to measure and improve our sites and service, to assist our marketing campaigns and to provide personalized content and advertising. By clicking the button on the right, you can exercise your privacy rights. For more information see our privacy notice.
Privacy Policy

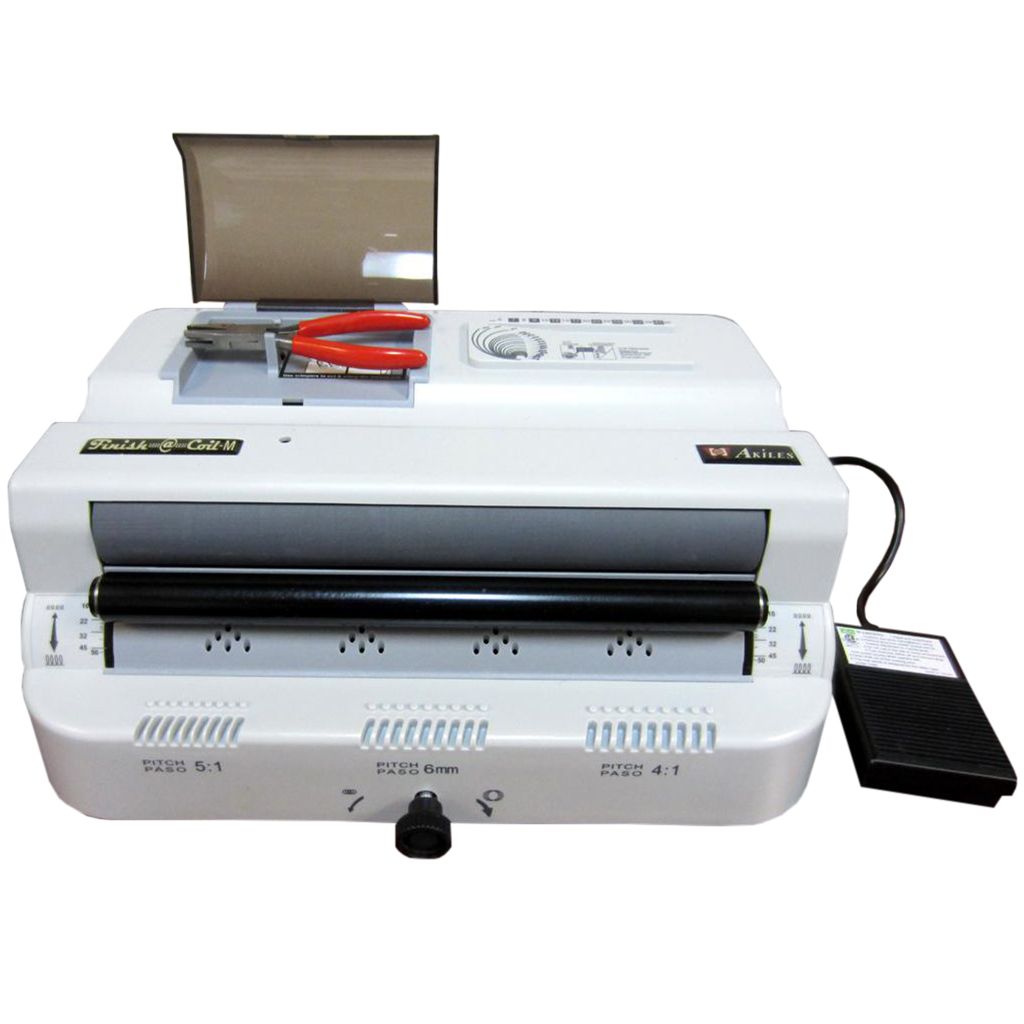
Akiles Finish-@-Coil M Electric Coil Inserter with Manual Cutter Crimper Pliers
522.99
NewCondition
InStock
Akiles Finish-@-Coil M Electric Coil Inserter with Manual Cutter Crimper Pliers


SWIPE FOR MORE IMAGES
- 0
- 1
- 2
- 3
- 4
- 5
- 6
- 7
- 8

Overview
The Akiles Finish-@-Coil M (pronounced finish a coil) is a handy electric desktop coil inserting machine that works with any standard spiral binding plastic coil. Perfect for small to medium offices that bind at least a few books per day, the Finish-@-Coil M will electrically roll the spiral coil into your pre-punched pages with just the tap of a foot pedal. Once completely inserted, simply use the included manual crimper pliers to finish each end of the coil, trimming them down and crimping in to prevent any roll-out. With this spiral binding coil finishing machine, you can quickly and professionally finish any coil notebooks.
Specifications
| Item # | 04AKFINISHM |
|---|---|
| Manufacturer | Akiles Products Inc |
| Manufacturer Part Number | Finish-@-Coil M |
| Suggested User | Small Office, Medium Office |
| Binding Style | Spiral Binding / Plastic Coil |
| Operation: Binding | Electric |
| Included Supplies & Accessories | Manual Cutter Crimper Pliers Diameter Guide |
| Compatible Supplies & Accessories | 4:1 Pitch Spiral Binding Coils |
| Power Voltage | 115V 60Hz |
| Actual Machine Dimensions ( L x H x W) | 14-1/2" x 11-1/2" x 7" |
| Shipping Length | 14" |
| Shipping Width | 17" |
| Shipping Height | 10" |
| Shipping (Web) Weight | 17 Lbs. |
| Certifications | CE |
| Manufacturer's Warranty | 1 Year Limited |
| Punch & Bind Capability | No [Binding Only] |
| Shipping Information | Ships via UPS |
Description
Whether you are an individual that sells your handmade spiral notebooks online or on Etsy, or you are an office that binds at least a couple of plastic coil books per day, the Akiles Finish-@-Coil M is a fantastic electric coil inserting machine for you. It has an array of features that make it an easy-to-use, efficient spiral binding inserter.
How to Use the Akiles Finish-@-Coil M:
• Start by determining the best coil size for your book. You can do this by assembling your entire book and placing it into the coil selector guide on the top of the machine. If between sizes, always choose the larger size to allow for easier page turning. Note: If you are not sure what size coil you have, you can hold the coil up to the chart and match it up with the sizes shown. If you need to know the pitch of your coil, you can place it onto the pitch identifier notches on the front (most coils are 4:1 pitch, meaning they have 4 loops/4 holes per inch)
• Set the rollers to the proper spacing for your coil using the knob on the front until the black roller aligns properly with the chart on the right.
• Place your stack into the u-shaped channel on top to curve the spine and make inserting the coil through the holes easier.
• Now roll the coil through the first few punched holes (you will need a punching machine to punch the holes; this is a coil inserter only, and will not punch the holes).
• Press the foot pedal to turn on the rollers, and hold your coil up to the rollers until it automatically begins to roll the coil through the rest of the holes. Pull the book away when there is about 1" of coil left on each side of the book.
• Now use the cutter crimper pliers to finish the ends of the coil. Make sure the red dot on the crimper is facing up, place it on the loop nearest the pages, and close them tight to cut and crimp in one-step. Flip the book over and repeat on the other side.
Features:
• Electric inserting rollers / manual crimping
• Foot pedal operation leaves both hands free to handle your book
• Included cutter crimper pliers and storage compartment
• Adjustable roller for different coil diameters
• U-shaped spine shaper for easier inserting
• Coil selector and coil determining guides
• Pitch identifier guide on front of machine
• Compact design doesn't take up much space
Stop manually rolling the coils through each individual hole; buy the Akiles Finish-@-Coil M online today. It will reduce strain on your hands, and greatly speed up the coil book binding process. Questions? Give us a call at (866) 537-2244.
Videos
Akiles Finish-@-Coil M
Transcript:
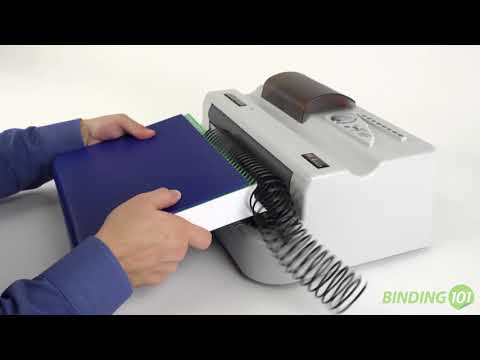
The Akiles Finish – a - Coil M is one of the easiest coil finishers to use that you can find in the market today. It is designed with one goal in mind, providing the maximum productivity with quality results while requiring minimum efforts from the operator.
This electric roller inserter is foot pedal activated, which allows the operator the use of both hands while having control of the roller.
The U-shaped alignment channel assists the operator to properly shape the document's spine, fo... Read More
This electric roller inserter is foot pedal activated, which allows the operator the use of both hands while having control of the roller.
The U-shaped alignment channel assists the operator to properly shape the document's spine, fo... Read More
The Akiles Finish – a - Coil M is one of the easiest coil finishers to use that you can find in the market today. It is designed with one goal in mind, providing the maximum productivity with quality results while requiring minimum efforts from the operator.
This electric roller inserter is foot pedal activated, which allows the operator the use of both hands while having control of the roller.
The U-shaped alignment channel assists the operator to properly shape the document's spine, for faster & easier coil insertion
The full length inserting rollers provide high friction making this inserter one of the easiest-to-use. And the adjustable bottom roller makes it easy to insert coils of different sizes, even the extra-large ones.
Added features on the Finish-a-Coil M unit include: A “coil pitch identifier” it will verify the coil pitch is the same as the punched document.
A diameter scale to help verify the coil diameter.
And a diameter selector, to best select the correct coil diameter size to the thickness of your document.
Cutter crimpers are included with every unit and the see-through crimper compartment provides convenient storage and helps to ensure that your crimping pliers don't get lost.
To operate, simply start the first couple loops of coil by hand. Hit the foot pedal to start the roller spinning and tap the coil against the roller. The coil automatically spins into the holes that were punched in the document.
To complete the binding process, simply insert the end of the coil into the hand crimping tool and squeeze. The excess coil is cut and crimped in one easy step.
Designed to work as a stand-alone unit, but it is small enough to sit on top of most punching machines.
And that’s the Akiles Finish-A-Coil-M coil inserter, sure to increase you coil binding productivity.
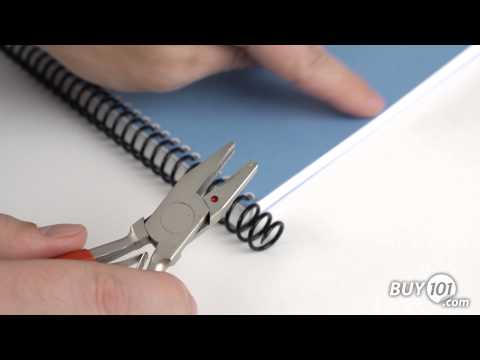
How To Use Cutter Crimper Pliers for Spiral Binding / Plastic Coil
Transcript:
Item# 05HANDCRMP
https://www.binding101.com/hand-cutter-crimper-pliers-for-spiralastic-plastic-coil
Cutting crimping pliers are used to finish the edges of spiral coils on the outsides of your book. They cut the coil to size, and crimp the edged in, preventing the coil from being spun our from the book.
Using the cutter crimper pliers is simple. Place your coiled document flat on a table. Looking at the pliers, you will see one side has a red dot and the other side doesn’t. With the re... Read More
Item# 05HANDCRMP
https://www.binding101.com/hand-cutter-crimper-pliers-for-spiralastic-plastic-coil
Cutting crimping pliers are used to finish the edges of spiral coils on the outsides of your book. They cut the coil to size, and crimp the edged in, preventing the coil from being spun our from the book.
Using the cutter crimper pliers is simple. Place your coiled document flat on a table. Looking at the pliers, you will see one side has a red dot and the other side doesn’t. With the red dot of the pliers facing → UP, ← position the pliers into the right hand side of the document with the cutting head in the center of the coil of the book
(It is important where the cutters are positioned on the coil; not too far down and not too far up, but into the center of the coil or they will not crimp). Now just squeeze the handles. Then →FLIP THE BOOK← and repeat the procedure
(You need to flip the book because the cutting crimping pliers only crimp in one direction)
Product Reviews
Write Your Own Review
Expert Reviews

About Our Expert • Mallory Morsa has worked in several different departments in her 10+ years at Binding101. Beginning in customer service and sales, she honed in her skills to provide the customer with professional, fast, and accurate information. Shortly after, she was promoted to sales supervisor and product expert, gaining hands-on and in-depth product research as well as training the team on new products. She now holds the position of content specialist, taking her extensive knowledge of our products and putting it on the web for you to access at any time. In her expert reviews, she outlines the good and the bad of products that she has handled herself, and uses her experience to identify the ideal users. If you have any questions or need more information about this product, please call our trained customer care team at (866)537-2244. Thank you for stopping by!


I RECOMMEND THIS FOR:
Pronounced “Finish a Coil”, the Finish-@-Coil M is a great entry-level coil inserter for those with lower volumes that want the convenience of electric inserting, without the high cost. Popular customers for this roller inserter include smaller to mid-sized offices that need to bind from time to time, but not every day. It is affordable, and function-rich with many features that help making inserting easier than rolling coils in by-hand.
WHAT I LIKE ABOUT IT:
There are several things that I like about the Finish-@-Coil inserter…for one, it has several features built into the machine to aide in the coil inserting; it is not just plain old rollers. On the top of the unit is a spine shaper called a U-channel, which curves your book block into the ideal rounded edge for coil inserting. If any of you have ever tried to insert a coil (especially a larger one) through a squared stack of sheets, you know that the coils get caught over and over and over again; this simple spine shaper channel helps remove that issue. It also has a coil diameter selector built into the machine. Now, a lot of punches will also have this, but including it on the inserter is a smart choice just in case, as well as for those that are using the machine in more of an assembly-line situation, so that users don’t have to reach over each other to get to the guide on the punch. It is such an easy way to get a recommended coil size, so there is no sheet counting or guessing; just slide the entire stack into the guide to see the recommended size (and remember to go 1 size up if you’re between sizes). Although not used too often, the front of the Finish-@-Coil also has a pitch identifier, so if you’re not sure if you have a 4:1 or 5:1 coil, you can determine it by holding your coil up to the indented guide.
Another great thing about the Finish-@-Coil is that it has two rollers, while many other machines in the same price range only have one. Plus, one of the roller is moveable and can be adjusted to the different size coil you are using. For larger coils especially, this is a feature I consider a necessity because using rollers too close together for large diameter spiral bindings will not work well. This feature lets you set the space between the rollers to the specific coil binder diameter you are using easily with the twist of a dial.
And lastly, it comes with a manual crimper included. Granted, many punch machines already have this, however, there is nothing wrong with having an extra one on-hand; especially when it can be stored so easily on the unit for quick access.
THINGS TO CONSIDER:
One thing to think about is the fact that the inserting may be electrically powered, but the crimping is still manual using crimper pliers. Some users find this task tedious, and for those doing enough volume of books, it may be worth it to invest in a machine that has both electric inserter rollers as well as an electric crimper, such as the Finish-@-Coil E1. Note, of course, that the investment needed for that upgrade is nearly double the price of this unit, so it may not be worth it to many smaller office users.
Something else to keep in mind is the material of the rollers themselves. One of the rollers is made of a rubber that grips the coil and actually rolls it in; this is a good thing. The other roller is made of plastic, which can sometimes lead to a bit of slipping. To avoid this, make sure to hold your book firmly against the rollers with both hands. For those who have never used an electric inserter, it can take a little time to get used to it. But once you get the hang of it, it is easy as pie.
THE BOTTOM LINE:
The Finish-@-Coil M is a perfect add-on unit for small and medium-sized offices that have either outgrown the tedious process of rolling coils in by hand, or have increased their volume to the point where making the process electric will be more efficient and less labor-intensive. It is incredibly affordable for what it offers, and is full of features to assist your inserting process, making it more than just a plain ‘ol spiral inserter. A mid-level unit, the Finish-@-Coil M still requires manual crimping of your coils with the included crimping pliers (the “m” stands for manual), but the efficiency and speed that the coil inserter can add is quite impressive.
Frequent Asked Questions
Submit a New Question


