Your Ultimate Guide to Document Binding Solutions
Have you ever considered making your own cook books at home? Or maybe you are a business just starting out and trying to discover a way to properly market your company to walk-in customers in an inexpensive way? Well document binding might be a solution perfect for you! In the sections below we will walk you through the “ins” and “outs” of book binding, the most popular methods of book binding, how it can make your business life easier, and offer you help purchasing your supplies from the start to finish of your project.
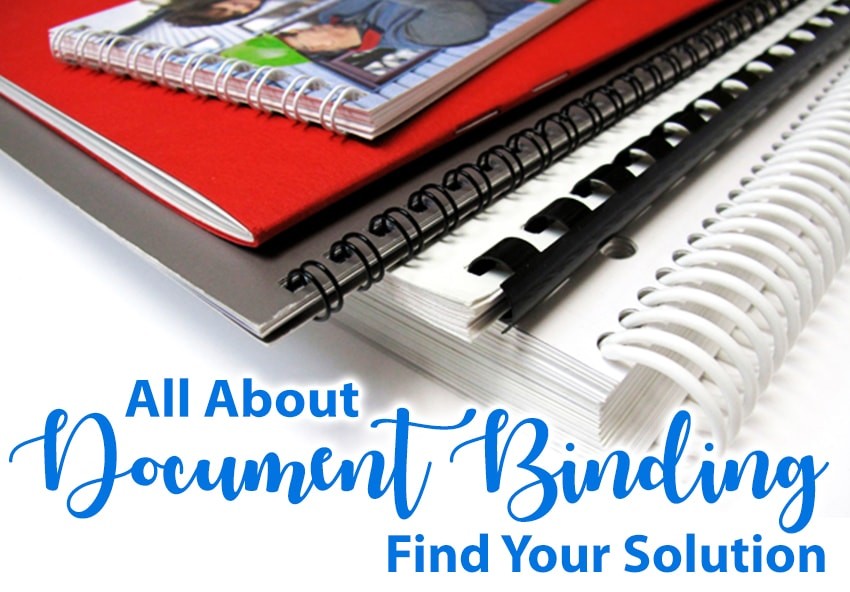
Now, let’s go over the different kinds of binding. The three most popular binding methods are called Wire-O, Spiral Binding (Plastic Coil) and Plastic Comb. All three of these binding methods require a punching machine that will punch holes in your paper. Below you will see a list of these three popular methods, along with a variety of other great binding methods that might work for you.
Wire-O Binding:
Wire-O Binding is often referred to as Double-O Wire or Twin Loop Wire. Books that are bound with Wire-O use a continuous hinge of double loops of wire to hold the book covers and pages together. This look is most popular among graphic designers as it offers a stylish and professional looking metal finish. This traditional method of binding secures pages so that they cannot be modified without de-binding the book. It is a punch and bind method that uses a wire binding machine. Books bound with Wire-O® Looped Wire lay flat on a table, and the sheets can turn a full 360°, making it the perfect solution for calendars and notebooks. Holes are available in round and square, and 3:1 or 2:1 pitch (holes per inch). Wire-O supplies are available in 10 different colors and sizes ranging from 1/4" up to 1-1/4" for books as thick as 1-1/8”.
Benefits:
-
• Pages turn easily, lay flat, and stay flat.
• Facing pages remain in perfect registration and open a full 360° (front-to-back).
• Available in spools, pre-cut/standard lengths, and custom cut lengths. Can easily be cut at home or the office with standard wire cutters.
• A wide selection of standard colors available in diameters from 1/4" up to 1-1/4"
Limitations:
-
• Metal can be bent out of shape (not favorable for storage or mailing).
• Higher costs than other binding methods
• Cannot reuse the wire elements once they have been removed
• Requires two different hole patterns to use full range of sizes
Hole Patters:
-
• 3:1 – 3 round or square holes per inch. Available in sizes 1/4" up to 9/16".
• 2:1 – 2 round or square holes per inch. Available in sizes 1/4" up to 1-1/4".
How to Bind Wire-O:
-
1. Position the paper guide on your binding machine based on your desired paper size. Gather your printed sheets and insert the allotted amount of paper into the opening. When the paper is fully inserted, slide the stack to the left until it makes contact with the paper guide. To make sure all of the edges of the sheets are flush, tap the sides of the stack. Activate the punching by using the pull handle, push button, or foot pedal on your binding machine.
2. Arrange your sheets in the desired order. Flip the back cover so that it is on the front of the arrangement. The inside of your back cover should now be the first sheet in your arrangement. You will see in later steps that this will hide the wire spine, making the appearance more professional.
3. Set your Wire Closer to the appropriate Wire-O size that you are using. Set the edge of your book with the wire into the wire closer opening. Pull the wire closer handle to close and secure the wire around you calendar.
4. Flip the top sheet (your back cover) to the back of the book to hide the spine and see your completed Wire-O Book.
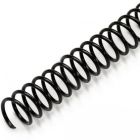
Spiral Binding (Plastic Coil) Binding:
Spiral Binding is also often referred to as plastic coil. Books that are bound with spiral use a continuous piece of plastic spiral coil binding that is spun through a series of closely spaced holes along a binding edge that have been punched by a plastic coil spiral binding machine. Pages can turn 360° so books lay flat. This is a durable method of binding and maintains its original shape, even with excessive use. Several colors are available including custom color matches. Diameters range from 6mm (1/4") up to 50mm (2").
Benefits:
-
• Modern and clean appearance
• Durable; maintains original shape
• Economically prices binding supplies
• Wide variety of color options
Limitations:
-
• Subject to extreme temperatures (although with our 75years in the binding industry, we have never encountered a customer with a temperature issue high enough to melt or warp their coils)
• Not optimal for projects requiring tight registration across spreads. Pages do not align perfectly from side to side because of angled rotation of the coils
Hole Patters:
-
• 4:1 – 4 round holes per inch. Available in sizes 6mm (1/4") up to 50mm (2").
• 4:1 – 4 oval holes per inch. Uses same coils as round 4:1 pitch.
• 5:1 – 5 round holes per inch. Available in sizes 6mm (1/4") up to 20mm (3/4"). 5:1 Pitch Spiral Binding Coils are a special order item and are very rarely used.
How to Bind Spiral Binding:
-
1. Position the paper guide on your binding machine based on your desired paper size. Gather your printed sheets and insert the allotted amount of paper into the opening. When the paper is fully inserted, slide the stack to the left until it makes contact with the paper guide. To make sure all of the edges of the sheets are flush, tap the sides of the stack. Press the foot pedal, button, or pull the handle to punch the sheets.
2. Manually insert and spin the plastic coil into the first 3 or 4 holes of your stack. If you are using the optional electric coil inserter, hold the binding edge of the book with the coil against the activated spinning rollers. If you are not using the electric coil inserter, continue to spin the coil manually all the way through the binding edge.
3. Place your book flat on the table. Using your right hand, make sure that the red-dot on the cutter & crimper pliers is facing up. Place the cutting head to the center of the coil & squeeze the handles. It is important to center that cutting head, otherwise the the coil will not crimp. Flip the book over and repeat the steps to cut & crimp the other side.
Plastic Comb Binding:
Plastic comb binding is a traditional, economical, and simple binding method. Made of PVC Plastic, the combs consist of a spine of round rings that spread open for sheet inserting. The rings fit into rectangular holes along a binding edge. The standard length of a binding comb is 11" and it has 19 rings. Plastic comb binding (often called GBC combs) is perfect for those who will need to edit their documents, as the bindings can be easily opened and closed. Plus, most GBC comb binding machines come with the wire closer on the unit, so you don't have to buy two pieces to bind.
Benefits:
-
• Widely available
• Inexpensive
• Imprinting of spine for customization
• Can add or remove pages
• Can reuse spine after removed from book
• Can be cut in house to any length
• Facing pages align
• Wide range of diameters
Limitations:
-
• Fewer standard color choices
• Pages cannot be turned all the way around (360°)
• Pages slightly step up when turned
Hole Patterns:
-
• Rectangular plastic comb pitch. Available in sizes 3/16" up to 2"
How to Bind with Plastic Comb:
-
1. Position the paper guide on your binding machine based on your desired paper size. Gather your printed sheets and insert the allotted amount of paper into the opening. When the paper is fully inserted, slide the stack to the left until it makes contact with the paper guide. To make sure all of the edges of the sheets are flush, tap the sides of the stack. Activate the punching by using the pull handle, push button, or foot pedal on your binding machine.
2. Place the Plastic Comb in the Comb Opener with the wide portion of the spine facing away from you -- this should ensure that the Comb opens toward you. Pull the handle to open the Comb.
3. Place the holes of your stack over the Comb teeth and push the handle back into original position to close and secure the Comb to your stack of paper. Remove your finished book.
Perfect Binding:
Perfect Binding, also referred to as soft cover binding, is similar to paper back novel binding. Unlike some binding processes that require sewing the pages into the spine of the book, Perfect Binding requires no sewing, and instead uses a strong binding adhesive and strips is used to hold the pages in place by attaching them to a soft cover. When finished, Perfect Binding creates a clean look with a flat spine. Sometimes referred to as case binding, the use of Perfect Binding also lends itself to smaller publishing concerns, such as desktop publishing and self publishing in the publish on demand businesses. The equipment required to create a perfect bind is relatively simple and easy to operate. Glues used in this binding technique are also easy to work with, making the task of creating a professional look possible even by people with little binding experience. Perfect Binding is utilized for many types of soft-cover type books, manuals, corporate reports, brochures, and other simple collections of documents.
Benefits:
-
• Versatile
• Completely customizable covers & spines
• Inexpensive
• Professional
Limitations:
-
• Expensive equipment
• Can only bind soft cover books
Hole Patterns:
-
• No hole pattern
How to Bind with Perfect Binding:
-
1. Press "Automatic" and place the book into the clamp. The DB-280 will automatically process it through the notching, gluing and nipping areas.
2. Once the book is notched the first time, place your custom cover into the nipping table and adjust the measuring guides to your paper to be perfectly centered. The book block is then added to the cover and nipped securely on.
Saddle Stitch Binding & Booklets:
Saddle Stitch is one of the simplest and most widely used methods of binding. Saddle Stitching and Booklet Making can be done using three different pieces of equipment: a Saddle Stapler, a Saddle Stitcher, or a Booklet Maker. A Saddle stapler uses staples along the binding edge. A Saddle Stitched used Stitching Wire that is on a spool. A Booklet maker uses staples and folds/staples the booklet. For Saddle Staplers & Stitchers, folded booklets are placed over a "saddle" and then the staples or stitching wire are inserted along the spine. Books bound using saddle stitch lay relatively flat and are most commonly used for applications including booklets, brochures, newsletters, pamphlets, direct mailers, magazines, and catalogs. They also have the ability to accommodate special inserts such as business reply envelopes, membership forms, order forms, etc.
Benefits:
-
• Fast
• Inexpensive
• Widely available
• Lays relatively flat
• Accommodates special inserts like business reply envelopes, order forms, etc...
• Foldouts are possible
Limitations:
-
• Not recommended for pieces intended for heavy use
• No printable spine
• Thickness limitations
• May require special design adjustments
Hole Patterns:
-
• No hole pattern requirement
How to Bind with Saddle Stitching:
-
1. Sheets are collated and folded
2. Sheets are then opened and hung over a "saddle" or chain
3. Product is "stitched" or stapled through the fold
4. Book may be trimmed on all three sides for a cleaner look
Velobind Binding:
VeloBind Binding is most commonly used in the legal industry. It is a secure way to bind documents with rigid plastic strips that are either heat sealed closed or snapped together. There are two strips used in the binding process. For hot knife below, one strip contains 11 prongs made to be inserted into the punched paper. The other is flat with 11 corresponding holes. Using a hot knife VeloBind machine, the prongs are inserted into the holes of the flat spine. Using heat, the two plastic Velo strips are melted and sealed together, creating one of the most secure binds available. Cold knife velobinding snap together and feature 4 prongs. VeloBind strips are available in 1", 2" and 3" capacities and 8-1/2", 11", and 14" lengths.
Benefits:
-
• Permanent Bind
• Flat spine
• Professional
Limitations:
-
• Fewer standard color choices
• Book doesn't lay flat
• Cannot cut to length
• Cannot reuse binding element if removed
Hole Patterns:
-
• 11 Hole VeloBind pattern – Available in sizes 1" up to 3"
How to Bind with VeloBind:
-
1. Punch sheets using your VeloBind machine
2. Insert the flat spine
3. Place the punched sheets on top of the flat spine
4. Insert the prongs on the other spine into the holes in sheets
5. Push the button on the machine to produce a tight, permanent Velo bind
3-Ring Binding:
A 3-Ring Binder is an office accessory that never seems to go out of style. We stock an assortment of three ring binder organizers varying in sizes from a 1/2" capacity binder through a 4" capacity binder. Our range of binders and organizers include those designed in Poly, eco-friendly chipboard, or the standard view binders. All of our binders are heavy duty, durable, and ideal for manuals, catalogs, reports, presentations, directories, handbooks, boardrooms, school needs, and more! We have standard letter size binders and mini binders, as well as clearview and poly plastic ring binders...PLUS they can be custom printed to make a one of a kind marketing piece for your office.
Benefits:
-
• Three Ring Binders are readily available from a variety of locations
• Available in many different materials, such as vinyl (which is the standard binders you find at the store) polyethylene and even fabrics.
• Customizable – we can custom make three ring (or more/less) binders to fit anyone’s needs. We can also print on the front offering an impressive stand-out-from-the-crowd affect.
Limitations:
-
• Stocked in just two sizes… letter size and half size
Hole Patterns:
-
• Standard 3-Hole for 8.5” x 11” letter size sheets
• Standard 3-Hole for 85” x 5.5” half size sheets
• 2 hole, 6 hole, and more available upon request for custom orders
How to Bind with 3-Ring Binders:
-
1. Simply place your punched sheets onto the rings and close them.
Loose Leaf Ring Binding:
Binding Rings are an easy and affordable method of binding materials that may require frequent editing. Photo Albums, reports, fabric swatches, and point of purchase displays are only a few of the popular applications bound with these hinged binder rings.
Benefits:
-
• Available in metal loose leaf (round), metal screw lock (round with 1 straight edge), and snap lock plastic rings
• Large binding capabilities – Loose Leaf Rings can be purchased as small as ½” and Screw Lock Rings can be purchased as large as 10”
• No limiting punch patterns. Just drill standard ¼” holes in your paper at any intervals and insert the screw posts.
• 4. No expensive equipment needed
Limitations:
-
• Rings hang loose from the paper, which for small books with lightweight papers can possibly rip the holes in the paper. This is easily solved by adding standard hole reinforcements on any lightweight paper used. Adding front and back covers can also help the durability.
• Rings extend past the paper once bound due to their shape, so this is not ideal for storing or filing
Hole Patterns:
-
• There is no required hole pattern for binding rings, however, most customers choose to use a three hole puncher. Standard 3-hole punches create a ¼” hole, which is all that is needed to bind with binding rings.
How to Bind with Binding Rings:
-
1. Drill holes in your book as many times as needed
2. Insert the open binding ring and snap (plastic snap lock rings or metal loose leaf rings) or screw (screw lock rings) the ring closed.
Screw Post (Chicago Screw) Binding:
Screw post fasteners (often referred to as chicago screws or binding posts) are a great choice for binding photo albums, swatch books, scripts, architectural blueprints, engineering drawings, or any application where loose sheets need to be kept together. We have aluminum screw posts, steel binding posts, and plastic chicago screws in several styles.
Benefits:
-
• Large binding capacity – Silver aluminum screw posts are available as long as 5”.
• Capacity can be extended by simply adding screw post extensions.
• Available in Plastic, Aluminum or Heavy Duty Steel
• Plastic Screw Posts are available in black and white. Aluminum Screw Posts are available in silver, black, gold or antique brass.
• Screw Post heads lay almost flat, keeping your book very even for stacking & storing.
• No limiting punch patterns. Just drill standard ¼” holes in your paper at any intervals and insert the screw posts.
• Easy editing of books without damaging the materials or screw post
• No expensive equipment needed
Limitations:
-
• Books will not lay flat
Hole Patterns:
-
• There is no required hole pattern for screw posts. Standard 3-hole punches create a ¼” hole, which is all that is needed to bind with screw posts.
How to Bind with Screw Posts:
-
1. Drill holes in your book as many times as needed
2. Insert the long side of the screw post (called the female side) into the hole. Take the small side of the screw post (called the male side) and insert it into the hole of the female screw post. Screw them together to create a tight bind.
 About the Author • Mallory Morsa is the product expert and content specialist at Binding101, and has been a valued team member since 2008. She started her career here in customer service, moved onto sales supervisor, product management, and then onto content. She takes a hands-on approach to products, and truly gets to know how every item works before she writes about them, with a goal to give you all of the honest information you need to make a confident buying decision. She has a bachelor's degree with a focus on management and marketing, and has been a writer, photographer, and videographer for many years. In her free time, she loves to read by the pool, volunteer at the local animal shelter in the kitten nursery, and snuggle her three furbabies while she binge watches Netflix.

Hi! My name is Mallory and I have been in the industry since 2008. If you do the math, that is over 15 years. I have spent my time at Binding101 in many roles, including customer service, sales, e-commerce management, video production, and more! Because of this vast experience, I bring a truly expert touch to the content in our blog. widdling down complex topics to extract what our customers really want to know. As the Content and UX Manager, I act as a writer and editor for the majority of copy you will find here. When not at my computer, I love spending time binging stand-up comedy, baking, and cuddling up with my family and rescued cats and dogs...